Using SDR-Sharp (Examples of using RTL-SDR in uBITX #3)
This document applies to most SDR Software that does not support IF-output and CAT communication.
CAT Support uBITX Firmware CEC Version supports SDR connections from Version 1.07.
http://www.hamskey.com/2018/04/how-to-connect-sdr-rtl-sdr-to-ubitx-and.html

1.Install
https://airspy.com/download/
Download & Install

Extract zip file

if you using RTL-SDR, Execute 'install-rtlsdr.bat'


Execute zagdig.exe

Click the 'Option -> List All Devices'

Select 'RTL2832U'

Click the 'Install Driver' Button
2.Execute SDR-Sharp

Select your SDR and Click the 'Configuration Button'

Setup SDR Configuration

Click the 'Start' Button

Change Frequency to IF output Frequency.
The sound of the frequency displayed on your transceiver will be output at 30Mhz.
SDR # does not support IF output and CAT communication, so the frequency will be difficult to read.
3.UBITX setting for SDR Software that does not support SDR # IF Output
Execute uBITX_Manager


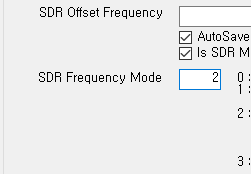
Input SDR Offset Frequency,
SDR Frequency Mode is 3

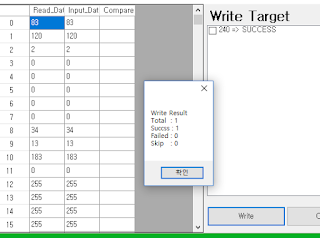
Write to uBITX

Reboot uBITX
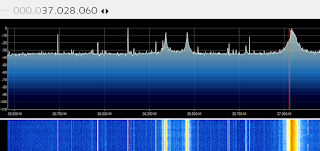
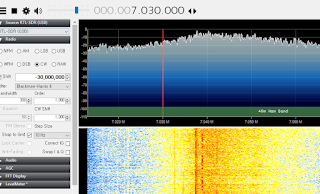
You will be able to deduce your frequency by reading only the Khz unit in SDR Sharp.
Below is 30.073.550 and if your radio is currently tuned to the 7Mhz ham band, it will be 7.073.550 Hz.

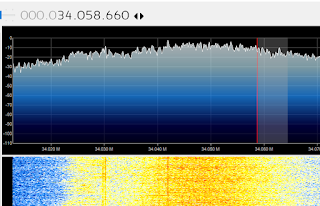
If you switch to the 14Mhz band, it would look like this:
The frequency shown in the figure below is 14.036.490Hz because you can replace '14' instead of '30'.

4.Another way to read frequencies freely in SDR #
This part is only for uBITX users.
I added some frequency control logic to use uBITX in SDR # or various SDR Software.
For a description of uBITX Manager, see other posts on the blog.
In uBITX Manager, click 'Connect' -> 'Read from uBITX' -> 'Decode'
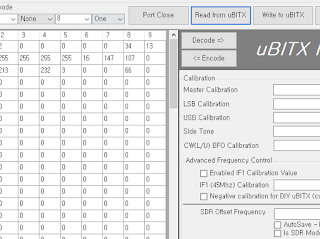
Set SDR Frequency Mode to No. 2.
Write a value to uBITX.
Reboot uBITX
Probably it will not receive at 30Mhz of SDR #.
This is a frequency control method that changes 10Mhz unit to 30Mhz.
If your uBITX LCD window shows 7.075Mhz, SDR # will be received at 37.075Mhz.
If 14.077Mhz is displayed on the LCD of your uBITX, it will be received at 34.077Mhz.
3.075Mhz => 33.075Mhz in SDR#
7.030Mhz => 37.030Mhz in SDR#
14.030Mhz = 34.030Mhz in SDR#
21.077Mhz = > 31.077Mhz in SDR#
It may seem a bit more uncomfortable than item 2 above.
If you are comfortable using item 2, you can write it that way.
However, this function is more convenient when you shift the frequency.
Offset is set to -30Mhz at 10Mhz or less.
Example : 7.050Mhz in uBITX LCD
SDR # will now display the correct frequency.
This can be used for all SDR soft as well as SDR #.
For the 10 ~ 20Mhz band, enter -20Mhz.
Example : 14.050Mhz in uBITX LCD

Of course, 20Mhz and above -10Mhz only.
In order to support most SDR Softs in this way, I put the IF frequency control option as an option.
You only need to memorize -30Mhz, -20Mhz, and -10Mhz.
I added some frequency control logic to use uBITX in SDR # or various SDR Software.
For a description of uBITX Manager, see other posts on the blog.
In uBITX Manager, click 'Connect' -> 'Read from uBITX' -> 'Decode'

Set SDR Frequency Mode to No. 2.

Write a value to uBITX.

Reboot uBITX
Probably it will not receive at 30Mhz of SDR #.
This is a frequency control method that changes 10Mhz unit to 30Mhz.
If your uBITX LCD window shows 7.075Mhz, SDR # will be received at 37.075Mhz.

If 14.077Mhz is displayed on the LCD of your uBITX, it will be received at 34.077Mhz.

3.075Mhz => 33.075Mhz in SDR#
7.030Mhz => 37.030Mhz in SDR#
14.030Mhz = 34.030Mhz in SDR#
21.077Mhz = > 31.077Mhz in SDR#
It may seem a bit more uncomfortable than item 2 above.
If you are comfortable using item 2, you can write it that way.
However, this function is more convenient when you shift the frequency.
Offset is set to -30Mhz at 10Mhz or less.
Example : 7.050Mhz in uBITX LCD

SDR # will now display the correct frequency.
This can be used for all SDR soft as well as SDR #.
For the 10 ~ 20Mhz band, enter -20Mhz.
Example : 14.050Mhz in uBITX LCD

Of course, 20Mhz and above -10Mhz only.
In order to support most SDR Softs in this way, I put the IF frequency control option as an option.
You only need to memorize -30Mhz, -20Mhz, and -10Mhz.
5.QSO With SDR#
You can use various Plugin and DSP functions which are basically supported in SDR #.


In addition, SDR # supports external plugins, so you can find and add plugins for you.
https://www.rtl-sdr.com/sdrsharp-plugins/


When you search for SDR # Plugin in the internet, you will be amazed at the huge plugins.
Below is an example of how to add a simple plugin.
Search Plugin in
https://www.rtl-sdr.com/sdrsharp-plugins/
Click the 'Download Here' Link

Click the 'Download' Button


<?xml version="1.0" encoding="utf-8" ?>
<sharpPlugins>
<add key="AF DNR" value="SDRSharp.DNR.AFNoiseReductionPlugin,SDRSharp.DNR" />
<add key="IF DNR" value="SDRSharp.DNR.IFNoiseReductionPlugin,SDRSharp.DNR" />
<add key="Baseband Noise Blanker" value="SDRSharp.NoiseBlanker.BasebandNoiseBlankerPlugin,SDRSharp.NoiseBlanker" />
<add key="Demodulator Noise Blanker" value="SDRSharp.NoiseBlanker.DemodulatorNoiseBlankerPlugin,SDRSharp.NoiseBlanker" />
<add key="Wave Recorder" value="SDRSharp.WavRecorder.WavRecorderPlugin,SDRSharp.WavRecorder" />
<add key="Zoom FFT" value="SDRSharp.ZoomFFT.ZoomFFTPlugin,SDRSharp.ZoomFFT" />
<add key="Band Plan" value="SDRSharp.BandPlan.BandPlanPlugin,SDRSharp.BandPlan" />
<add key="Frequency Manager" value="SDRSharp.FrequencyManager.FrequencyManagerPlugin,SDRSharp.FrequencyManager" />
<add key="Signal Diagnostics" value="SDRSharp.Diagnostics.DiagnosticsPlugin,SDRSharp.Diagnostics" />
</sharpPlugins>
Append 1 Line
<add key="LevelMeter" value="SDRSharp.LevelMeter.LevelMeterPlugin,SDRSharp.LevelMeter" />
<?xml version="1.0" encoding="utf-8" ?>
<sharpPlugins>
<add key="AF DNR" value="SDRSharp.DNR.AFNoiseReductionPlugin,SDRSharp.DNR" />
<add key="IF DNR" value="SDRSharp.DNR.IFNoiseReductionPlugin,SDRSharp.DNR" />
<add key="Baseband Noise Blanker" value="SDRSharp.NoiseBlanker.BasebandNoiseBlankerPlugin,SDRSharp.NoiseBlanker" />
<add key="Demodulator Noise Blanker" value="SDRSharp.NoiseBlanker.DemodulatorNoiseBlankerPlugin,SDRSharp.NoiseBlanker" />
<add key="Wave Recorder" value="SDRSharp.WavRecorder.WavRecorderPlugin,SDRSharp.WavRecorder" />
<add key="Zoom FFT" value="SDRSharp.ZoomFFT.ZoomFFTPlugin,SDRSharp.ZoomFFT" />
<add key="Band Plan" value="SDRSharp.BandPlan.BandPlanPlugin,SDRSharp.BandPlan" />
<add key="Frequency Manager" value="SDRSharp.FrequencyManager.FrequencyManagerPlugin,SDRSharp.FrequencyManager" />
<add key="Signal Diagnostics" value="SDRSharp.Diagnostics.DiagnosticsPlugin,SDRSharp.Diagnostics" />
<add key="LevelMeter" value="SDRSharp.LevelMeter.LevelMeterPlugin,SDRSharp.LevelMeter" />
</sharpPlugins>


Very Easy!!
You can use various plugins through this easy way.
The following video was taken when I wrote this article.
Comments
Post a Comment