How to use Wsjtx-Portable (Wsjtx 1.8.1 based Small LCD version)
This article is based on Wsjtx-Portable Version 0.5.
The video you shot while creating this document are at the bottom of this document.
Connect the sound card to Wsjtx-Portable and connect the CAT communication cable of the transceiver. Then connect the power.
1.Launcher Portable - (System Startup / System Shutdown)
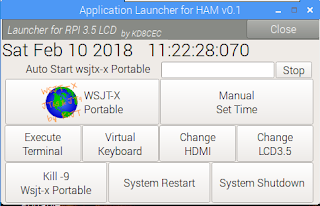
3.5 Inch LCD shows RPI booting and launches Launch-Portable automatically.
Launch-Portable is made for convenient use of Wsjtx-Portable.
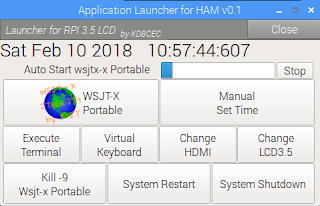
Wsjtx-Portable will be executed automatically when the progress bar at the top is completed.
Wsjtx-Portable executed.
Touch the Exit button to exit Wsjtx-Portable.
When the following message box appears, touch Yes.
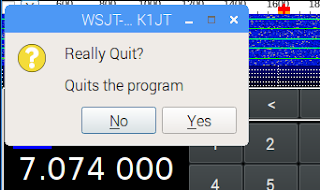
back to Launcher Portable.
Launcher Portable is just a simple program that automatically launches Wsjtx Portable.
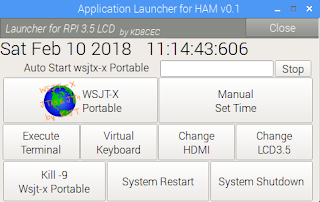
To Turnoff Raspberry PI, touch the System Shutdown button.
When the following message box appears, touch Yes.

To restart Raspberry PI, touch the 'System Restart'
When the following message box appears, touch Yes.

2.Launcher Portable - Execute functions
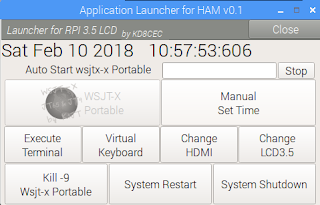
2.1 Manual Run Wsjtx-Portable
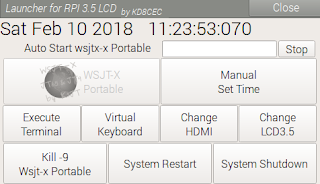
Press the Stop button when Progress Bar is running as shown below.
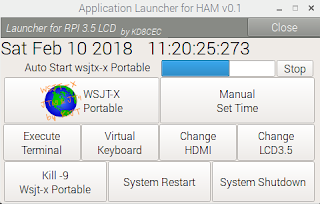
Then Progress Bar will stop and Wsjtx-Portable will not run automatically as shown below.
If you want to run Wsjtx-Portable here, touch the WSJT-X Portable button.
This is how to run Wsjtx Portable manually.

Touch the Exit button to exit Wsjtx-Portable.
If it is only for communication without logbook, it does not need all year, month, day, and hour. We need just precise minutes and seconds.
Someone will say. 'Hey! To use JT65 (FT8, WSPR), RPI must exactly match Internet time.'
Yes. But we are in the outdoor.
And, in fact, even if it is 1 ~ 2 seconds wrong, communication is not a big problem.
You can also adjust the time using decoded messages while communicating. If you are experienced digital communication experience, you already know. (I'll post this separately later.)
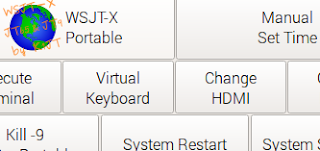
The 'Manual Set Time' button is used to manually adjust the time for digital communication.
Touch the 'Manual Set Time' button
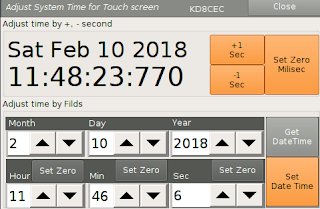
This is the RPI's System time. This is to see the change of the system time while adjusting the time.
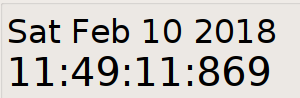
If there is no time synchronization in the RPI, it proceeds from the time of the last time before shutdown.
Setting the date is optional. I usually only fit minutes and seconds.
Touch the Get DateTime button to set the time.
Then press the buttons below to set the time on your wristwatch or Cellphone.
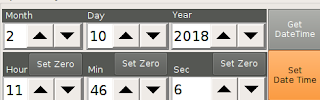
Then touch the 'Set Date Time' button. you can see the time has changed.
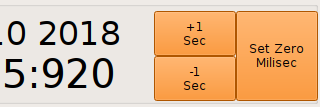
Now it's time to fine-tune.
Use '+1 Sec' or '-1 Sec' to make fine adjustments.
also you can fine-tune the time using 'Set Zero milisec'.
30:320 -> Touch 'Set Zero Milisec' -> 30:000
If you practice once or twice, you can adjust the time easily and quickly.
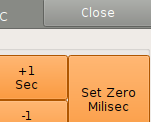
Touch the close button to exit.
Touch the 'Change HDMI' button when the screen is displayed on the LCD, and the screen will switch to HDMI after a while. - Be sure to connect the HDMI cable before touching.
After completing all the settings and tests conveniently on your computer, be sure to click 'Change LCD 3.5' button. The screen will appear again on the LCD.


This article is based on Wsjtx-Portable Version 0.5.
The video you shot while creating this document are at the bottom of this document.


Connect the sound card to Wsjtx-Portable and connect the CAT communication cable of the transceiver. Then connect the power.
1.Launcher Portable - (System Startup / System Shutdown)
3.5 Inch LCD shows RPI booting and launches Launch-Portable automatically.
Launch-Portable is made for convenient use of Wsjtx-Portable.

Wsjtx-Portable will be executed automatically when the progress bar at the top is completed.

Wsjtx-Portable executed.

Touch the Exit button to exit Wsjtx-Portable.
When the following message box appears, touch Yes.

back to Launcher Portable.
Launcher Portable is just a simple program that automatically launches Wsjtx Portable.

To Turnoff Raspberry PI, touch the System Shutdown button.
When the following message box appears, touch Yes.

To restart Raspberry PI, touch the 'System Restart'
When the following message box appears, touch Yes.

2.Launcher Portable - Execute functions
Restart Raspberry Pi
2.1 Manual Run Wsjtx-Portable
Press the Stop button when Progress Bar is running as shown below.

Then Progress Bar will stop and Wsjtx-Portable will not run automatically as shown below.

If you want to run Wsjtx-Portable here, touch the WSJT-X Portable button.
This is how to run Wsjtx Portable manually.


Touch the Exit button to exit Wsjtx-Portable.
2.2 Manual Set Time
In order to use JT65, FT8, WSPR, etc., the RPI time must match the standard time.
There are many ways to set the correct time on the RPI.
A. The simplest way is to connect the internet cable. However, it is difficult to use it outdoors.
B. Many people build NTP by connecting GPS to the RPI. There are quite a number of ways to build NTP by connecting GPS to the RPI on the Internet. I would like to recommend this method. I will use this method as well.
C.It's the simplest way. It's a way to watch your wristwatch and set the RPI's time. Be sure to set your wristwatch time correctly before you go outdoors.
Someone will say. 'Hey! To use JT65 (FT8, WSPR), RPI must exactly match Internet time.'
Yes. But we are in the outdoor.
And, in fact, even if it is 1 ~ 2 seconds wrong, communication is not a big problem.
You can also adjust the time using decoded messages while communicating. If you are experienced digital communication experience, you already know. (I'll post this separately later.)
The 'Manual Set Time' button is used to manually adjust the time for digital communication.
Touch the 'Manual Set Time' button

This is the RPI's System time. This is to see the change of the system time while adjusting the time.

If there is no time synchronization in the RPI, it proceeds from the time of the last time before shutdown.
Setting the date is optional. I usually only fit minutes and seconds.
Touch the Get DateTime button to set the time.
Then press the buttons below to set the time on your wristwatch or Cellphone.

Then touch the 'Set Date Time' button. you can see the time has changed.
Now it's time to fine-tune.
Use '+1 Sec' or '-1 Sec' to make fine adjustments.
also you can fine-tune the time using 'Set Zero milisec'.
30:320 -> Touch 'Set Zero Milisec' -> 30:000

If you practice once or twice, you can adjust the time easily and quickly.
Touch the close button to exit.

2.3 Vertual Keyboard
Wsjtx-Portable As mentioned in the installation process, all settings are recommended in Origianl Wsjt-x. It is wise to finish testing from the original Wsjt-X.
The 3.5-inch LCD is smaller than I thought. I installed a virtual keyboard in Wsjtx-Portable, but it's inconvenient.
Wsjtx-Portable is a project created to carry the great program Wsjtx in your pocket.
But really, there will be an emergency. Outdoors. I have experienced this a while ago.
I removed my Callsign to Wsjtx-Portable for create a distribution disk image. I forgot to do that and tried to use Wsjtx-Portable.
When this emergency comes, we must open our eyes wide and touch a small virtual keyboard.
Virtual keyboard exercises.
Touch the 'Virtual keyboard'
A virtual keyboard named Matchbox. Very small, right?
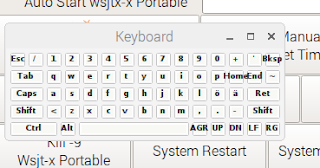
I still do not know how to make this keyboard always on top.
So I put the virtual mouse right button function in Wsjtx-Portable.
Press and hold the keyboard for about 2 seconds. The menu will then appear. There you can choose 'Stay on top'.
When you have finished typing, press the X button to exit.
The 3.5-inch LCD is smaller than I thought. I installed a virtual keyboard in Wsjtx-Portable, but it's inconvenient.
Wsjtx-Portable is a project created to carry the great program Wsjtx in your pocket.
But really, there will be an emergency. Outdoors. I have experienced this a while ago.
I removed my Callsign to Wsjtx-Portable for create a distribution disk image. I forgot to do that and tried to use Wsjtx-Portable.
When this emergency comes, we must open our eyes wide and touch a small virtual keyboard.
Virtual keyboard exercises.
Touch the 'Virtual keyboard'

A virtual keyboard named Matchbox. Very small, right?

I still do not know how to make this keyboard always on top.
So I put the virtual mouse right button function in Wsjtx-Portable.
Press and hold the keyboard for about 2 seconds. The menu will then appear. There you can choose 'Stay on top'.
When you have finished typing, press the X button to exit.
2.4 Change HDMI, Change LCD3.5
This button is used to set Wsjtx-Portable.Touch the 'Change HDMI' button when the screen is displayed on the LCD, and the screen will switch to HDMI after a while. - Be sure to connect the HDMI cable before touching.
After completing all the settings and tests conveniently on your computer, be sure to click 'Change LCD 3.5' button. The screen will appear again on the LCD.
2.4 Kill -9 Wsjt-x Portable
Occasionally, when you exit and re-run Wsjtx-Portable, you may see a 'Lock' message that does not work. It then finds and terminates the Wsjt process.

However, I recommend that you click the 'System Restart' button.
3.Wsjtx-Portable


Restart Raspberry Pi
Wsjtx-Portable is a very small change to Wsjt-x. Wsjt-x is a great program for itself.
I have added a few functions and changed the UI for use on a small LCD.
I will explain the new functions added to the original Wsjt-X.
This is because the original Wsjt-x is slightly modified and therefore the usage is the same.
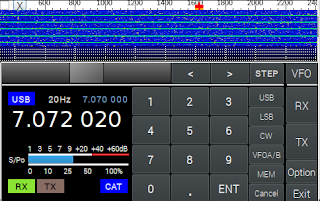
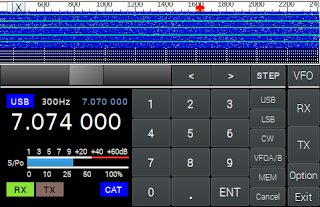
When Wsjtx-Portable is executed, the following screen will be displayed.
This is the Wsjtx-Portable main screen.

Below is a waterfall graph that was run as a separate window when running Wsjt-x.
This graph will always be displayed when Wsjtx-Portable is running.

This is the main window of Wsjtx-Portable.
Wsjtx-Portable has 4 tabs.

You can select the tab with the four buttons on the right.
If you press the bottom Exit button, Wsjtx-Portable will close.

3.1 VFO
When Wsjtx-Portable is executed, it is displayed by default. You can also touch the VFO button to display it.


Status information display of the connected Transceiver

If transmission mode, it changes as follows.

CAT communication is disconnected.
If the CAT communication problem occurs for any reason, the following changes are made.

At this time, touch the part marked 'Connect'.
If you do not have to reboot the RPI, it will probably succeed as shown below.
If you continue to experience problems, please restart your system.

It is a button to input frequency directly.

You can input all frequencies as shown below.
7.010 300 Mhz Input
Press '7'

Press '0'

Press '1'

Press '0'

Press '3'

Press '0'

Press '0'

Press 'ENT'

If you make a mistake in entering the frequency, you can cancel it at any time by pressing the Cancel button.

Easily type using '.'
Enter 7.070000
Press '7'

Press '.'

Press '0'

Press '7'

Press 'ENT'

Step Tune - using Up / Down Button

In the screen below, you can see that the step is 300Hz.

The STEP value changes by you touch the Step button.

Touch the STEP button to set the step to 20HZ.

Press '>'

Press '>'

Press '<'

Changing frequency with Slidebar
You can change the frequency by moving the slide bar to the left or right using your finger.

Touch and move with your finger

Release your finger. -> Set frequency to Trasceiver

Transceiver mode change button.

Prees 'LSB'

Press 'CW'

Press 'USB'

Memory
Touch the Mem button to save or recall the frequency.
The stored frequency will be shown.

Touch the 'Mem <-> VFO' button to save the frequency.

Touch the 'M05' button to save to M05.
After saving, return to the previous screen.

Touch the MEM button again.
Touch the M01 button to recall the frequency 14.074 000 stored in M01.

If you want to cancel the job from the memory management screen, press the Cancel button to cancel it.

Change VFOA/VFOB
The small 7.070 000 shown below is the other VFO.

Touch the VFO A / B button.

VFOA and VFOB would have toggled.

Press again to return

Caution : Memory and VFOB is not memory and VFOB stored in the transceiver.
It is make virtual Memory and VFO in the Wsjtx-Portable for use in most Transceiver that do not have memory or VFO switching function in communication protocol.
3.2 RX - All Received Message window
I simply called the name RX to distinguish the TAB. It may change in the next version.
Touch the RX button on the right.
This is the Listbox on the left side of the original Wsjt-x program.
This is the space where all decoded messages are displayed.
Button usage is the same as Original Wsjtx.

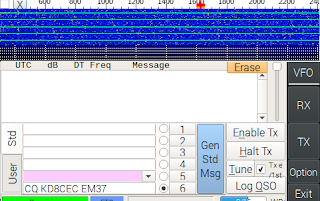
3.3 TX
This tab allows you to send a message.
Touch the TX button on the right.
This is the Listbox on the right side of the original Wsjt-x program.
At the listbox, a message will be sent and received at the selected frequency.
The 1, 2, 3, 4, 5, 6 buttons below are buttons to select the message to be transmitted.
The 'Gen Std Msg' button will automatically generate a message.
Other buttons are the same as original Wsjt-x.

3.4 Option
It is a collection of various options that were in the original wsjtx.
I do not know how to use it. Please tell me if you need to move to another tab.
I can only use JT65, FT8, WSPR. That's why I'm not familiar with the various options on this tab.
Due to the small size of the LCD, the main menu has also moved to this tab.


The functions of all menus are the same as the original wsjt-x.
Only the contents of the setup window were divided according to LCD3.5 size.

Here i have created a 'Launch keybord' button that allows you to enter a callsign and grid in an emergency.

This is the place where you have to open your eyes.


Other tabs are omitted.
Below is a video taken while writing this document.
The picture contains most of the above.
I think Wsjtx-Portable is now the first start. When it is my standard so far, it is the level which is under 0.3 version.
Wsjt-X is a great program by itself, so I just gave it a version of 0.5 (Wsjtx-Portable).
It is aimed to install QRP transceiver and take out Wsjtx-Portable from pocket and connect and use it immediately.
Wsjt-x is my favorite program and I respect the original Wsjt-x developers.
See the links below for the progress of Wsjtx-Portable so far.
Thanks for reading.
KD8CEC
Ph.D Ian Lee
1. I downloaded the full image and it loaded fine. I did notice a dhcp failure on bootup ..
ReplyDeleteThe main issue I noticed was there was no wifi detected.
As a test I loaded a raspian stretch image with wsjt-x. My wifi worked fine... with that image.
2. I wonder, if you would add a choice for 3.5 and 5inch lcd.. I have the 3,5 and it works. I also have a LCD5-show lcd which works but does not use the wsjt-x to full size.
Great start - all is looking good....
Joe VE1BWV
joe
DeleteThanks for your good information.
agree your suggestion, I think dhcp failure is not a problem and can be ignored. However, I received some feedback on several Wsjtx-Portable. It wants the user to connect directly through SSH. It is now fixed at 192.168.227.104 IP. I need to be able to switch this to DHCP so that the user can access it conveniently. Because of this, some buttons will be added to the next version of Launcher Portable.
I will check for wifi issues. Maybe this may be related to Raspberry pi 2. I created the image in Raspberry Pi2 for compatibility. RPI2 does not have Wifi.
I will test it.
I am worried about 5 inches. Wsjtx-Portable fixed size to 3.5 inches.I did not have a 5-inch LCD, and it's 5 inches big enough to fit in a concept pocket. However, tom (PA5FDX), which made the first test, was similar to you.
And one more thing! I will make Wsjtx-Portable for cars. It would be nice if Wsjt-X appears on the car dashboard.
The important point is that the size of the Video Out, PAL or NTSC, is similar to 5 inches.
I am looking for an experienced RPI to modify the script and create a Wsjtx-Portable image.
If you have a good idea, let me know.
PS : I tried QSO with Wstx-Portable and thought about moving 'Band Activity List' to TX Tab. The problem is small size.
Thank you for your comments.
Ian KD8CEC
Ian, have you ever looked into the wifi implementation? I'm running your image
Deletequite successfully (thank you!) but had to go change the configuration to DHCP on eth0...that works fine, but I cannot get wifi to work, either the built-in on the Pi3 nor on a wifi dongle. What can you suggest?
Again, thanks for all you are doing for the uBitX community...great stuff!
John WI6P
Hi Ian,
ReplyDeleteWith the release of the new enhanced FT8 and MSK144 modes in WSJT-X, will you be updating wsjtx portable to work with WSJT-X Version 2.0? Version 1.8 is obsolete as of 10- Dec-2018.
Still waiting for an update. I have wasted money on this one
DeleteHi, where can we find http://file.hamskey.com:5973/wsjtxp05.zip ?
ReplyDeleteSadly Ian gave up on this project
DeleteI have a copy of the file
DeleteI want to run portable, will this program still function given the changes made to WSJT-X?
ReplyDeleteThanks,
Jim W0CHL
Hello - This would be a great program to run on the Xiegu X6100's small screen natively. Have you updated the program to work with the newer versions of WSJT-X - WSJT-X is up to 2.6.1
ReplyDeleteInstall and Download: Begin by obtaining the WSJT-X Portable software from a reputable source. After downloading, unzip the contents to a convenient location on your computer also get in touch with hube power bank.
ReplyDeleteThis piece revolves around Wsjtx-Portable Version 0.5. Dive into the world of cryptocurrency research topics 2022, exploring the latest developments and trends with this portable tool, making the learning experience convenient and accessible.
ReplyDeleteGame 365 Live offers an exhilarating gaming experience like no other. With a vast array of interactive games and real-time competitions, players can immerse themselves in thrilling challenges anytime, anywhere. From classic favorites to innovative new releases, our platform caters to diverse gaming preferences. Join the excitement and elevate your gaming journey with Game 365 Live.
ReplyDeleteI found this topic while searching for information on how to use WSJTX 2.1.1 portable. I've been experimenting with it for my amateur radio activities. By the way, I saw the mention of ebook writers, which made me think about the potential applications outside of amateur radio.
ReplyDeleteExplore the benefits of Wsjtx-Portable, a condensed Wsjtx 1.8.1 version designed for tiny LCD panels. Remember that assistance is only a click away if you're feeling overburdened by schoolwork. Think about can i pay someone to write my assignment for me uk to complete your tasks so they can help you with accuracy and knowledge.
ReplyDeleteTake on the challenge of learning how to use Wsjtx-Portable, the condensed Wsjtx 1.8.1 version made for tiny LCD panels. While negotiating technological details, keep in mind that, with the correct assistance, logical barriers may also be met. Investigate dissertation help writing to guarantee an excellent and easy academic path.
ReplyDeleteThis comment has been removed by the author.
ReplyDeleteWSJTX-Portable (WSJTX 1.8.1 based Small LCD version), start by powering on the device and ensuring it’s connected to your radio and antenna system. The small LCD display will guide you through the setup process, where you can configure your frequency. Selecting the right fragrance requires attention to detail. Consider trying Lattafa Khamrah a perfume that offers a rich and captivating scent, perfect for those who appreciate precision and quality, whether in their tech setup or personal style.
ReplyDeleteAs soon as the progress bar at the top fills up, Wsjtx-Portable will start automatically. See hamiltonarborist.co.nz
ReplyDeleteJust Treats for Halloween is such a fun idea! From spooky decorations to delicious goodies, it’s all about creating a festive vibe. Similarly, finding the perfect houses for sale in Pearland can feel like a real treat, offering the ideal place to celebrate holidays and make cherished memories.
ReplyDelete