How to connect SDR (RTL-SDR) to uBITX
(uBITX Firmware CEC Version V1.071 Beta Release,
At the end of the beta test, we will release to 1.08.)
At the end of the beta test, we will release to 1.08.)
uBITX and SDR usage will be divided into several and will be posted.
Some users have attempted to connect SDR to uBITX.
I also supported SDR connections from uBITX since CEC Firmware 1.070 (Beta).
In addition to CEC Firmware, any firmware can connect SDR in the following way.
If you are not using CEC Firmware version 1.070 or later, you need to modify the source code a little bit because RTL-SDR can only receive more than 24Mhz.Also, there are a lot of better ways than I explain. I think that hardware experts will find ways to improve even more.
For example, using Latch Relay to control SDR connections, RTL-SDR to connect impedance, etc.
The current source structure is constantly changing to support various LCDs.
After the LCD type to support is selected, we will organize the source file structure and distribute it.
It will not take long. Please upload the Hex file using XLoader or avrdude for the time being. (I sometimes push source code to github but do not use it. It will continue to change for the time being)
uBITX_Manager
https://drive.google.com/open?id=1sUXi32N8ROS53tb51Y35C67XiTCmluiW
uBITX CEC Firmware V1.071 Beta
https://drive.google.com/open?id=1J8w3u2rfjEnZizQpIMxCqbTfGf2dgrKF
1. Cable preparation
If you are going to connect SDR directly to uBITX, this is not necessary.
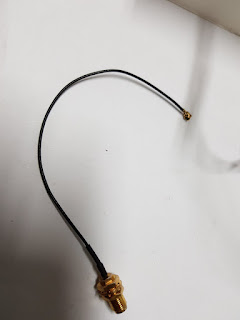
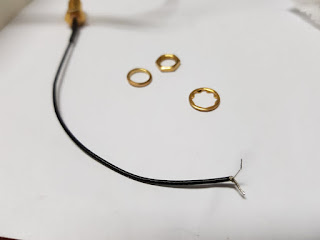
2. Connecting the cables
The schematic of ubitx can be downloaded below.
http://www.hfsignals.com/wp-content/uploads/2017/12/ubitxv3.pdf
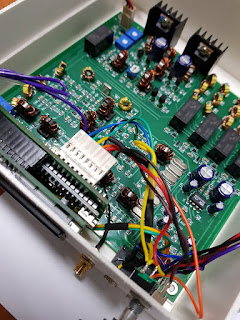
I connected the SDR to the bottom.
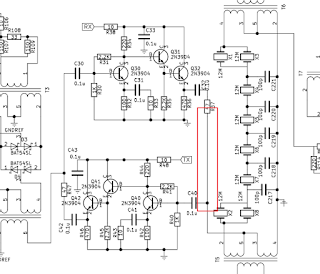
As you can see in the picture, that part is convenient to connect.
I will write about why I chose that part (the front of the 12Mhz filter) at the end of this document.
In particular, do you see a blank space next to it? I will put a relay on that space later.
But SDR performance is better than I thought. So maybe I can continue to use it as it is now.
If you SDR built in uBITX or connected the SDR antenna directly to the uBITX, the following operation is not necessary.
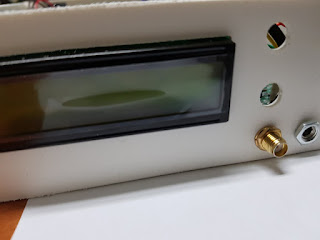
It's a really simple work.
3.uBITX Manager Settings
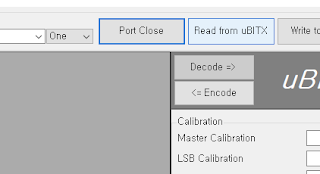
Click th 'Connect'

Click the 'Read from uBITX'
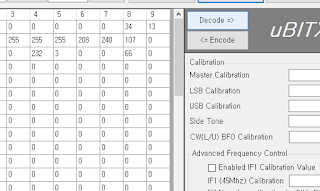
Click the 'Deocde =>'
4.Configuration for SDR
You will see the following screen.
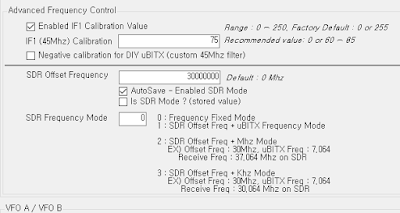
4-1 SDR Offset Frequency
This is where you enter the base frequency to transmit to SDR.
(Again, SDR connections do not necessarily have to use my firmware.
In most firmware you can change the IF frequency very simply by simple modified source code.)
Since I can receive more than 24Mhz for RTL-SDR, I entered 30Mhz here.
This depends on your radio condition and the type of SDR you have.
Example)
Enter 30000000

4-2 AutoSave - Enabled SDR Mode
In CEC firmware, uBITX should either send sound to the speaker, send it to SDR, or choose either one.
In SDR mode, no sound is output from the speakers.
In order to prevent misunderstandings, uBITX always operates in speaker mode when it is bootup.
However, if you have a very good SDR mode like me, you may want to keep in SDR mode until you switch to speaker mode through the menu. If you check this menu, SDR Mode will not be automatically released even if uBITX is rebooted.
I checked this option because SDR Mode and Speaker Mode can be switched at any time by menu.
4-3 SDR Frequency Mode
This part is too complicated.
I had to make a few options for most SDR software on Windows and Linux.
I will post an optimal connection with SDR Sharp, Linux, and Raspberry based SDR.

0 is transmitted at a fixed frequency.
1.The frequency entered above + uBITX is connected to SDR at the frequency shown on the LCD window.
For example, if the offset frequency is 30.000000 Mhz and the frequency displayed on the uBITX LCD window is 7.074000, it will be received at SDR of 37.074000.
2.SDR Offset Frequency + Mhz unit.
If Offset frequency is 30.000000Mhz and uBITX LCD display 7.074000Mhz, SDR will be received at 37.074000Mhz.
If Offset frequency is 30.000000Mhz and uBITX LCD display 14.074000Mhz, SDR will be received at 34.074000Mhz.
If Offset frequency is 30.000000Mhz and uBITX LCD display 21.074000Mhz, SDR will be received at 31.074000Mhz.
3.SDR Offset Frequency + Mhz unit.
If Offset frequency is 30.000000Mhz and uBITX LCD display 7.074000Mhz, SDR will be received at 30.074000Mhz.
If Offset frequency is 30.000000Mhz and uBITX LCD display 14.074000Mhz, SDR will be received at 30.074000Mhz.
If Offset frequency is 30.000000Mhz and uBITX LCD display 21.074000Mhz, SDR will be received at 30.074000Mhz.
Now select 0 because the example uses SDR-Radio to support CAT communication and IF input.
5.Press the '<= Encode'
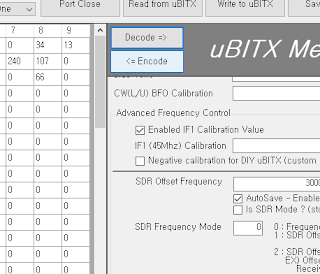
Write to uBITX
6. Omni-Rig Setting (Option)
It is not necessary.
However, I used the Omni-Rig because I wanted to be able to communicate uBITX simultaneously with SDR software and Wsjt-X.
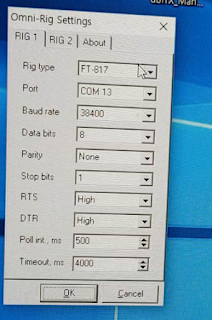
You only need to set Rig Type, Port and Baudrate.
Rig type : FT-817
Port : COM 13
Baud rate : 38400
Do not press 'OK'. You must leave it alone.
7.Launch the SDR Console.
SDR-Console can be downloaded from SDR-Radio. Please refer to the SDR-Radio homepage for details.
http://www.sdr-radio.com/
Run your own SDR.
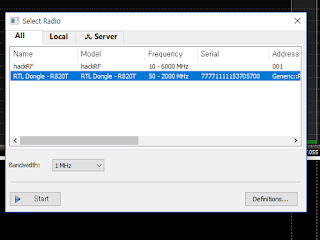
The reason I chose SDR-Radio is below.
This is because it supports IF output.
This is a great way to connect your HF device to your computer.
But do not worry. With the above options, other SDR software can be used without difficulty. Including Linux.
Press the Select button on the View toolbar.
Select External Radio.
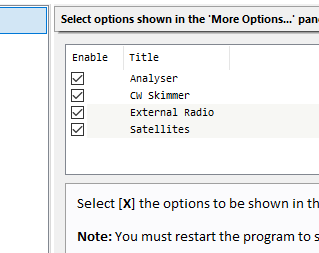
Then an External Radio button will be created on the toolbar as shown below.
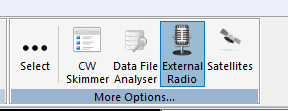
Click the External Radio button. The program will be restarted and the following screen will appear.
Press the '?' Button.
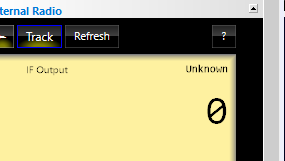
If Omni-Rig is running, it will automatically be selected as below.
(if unselected, select '1 : FT-817:On Line')
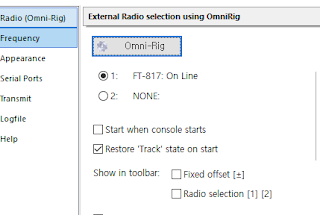
Click the Frequency button on the left.
Select IF output as shown below and enter 30.000.000.
30.000.000 is the value entered in uBITX Manager.
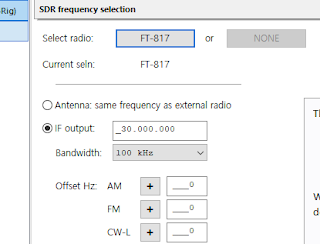
Press OK to close the window and press the 'Track' button.

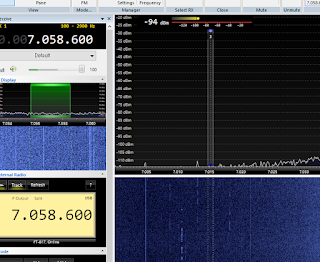
SDR and uBITX are fully connected.
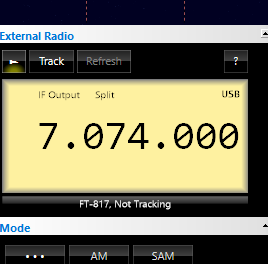
8.Switch to SDR Mode
Menu -> SDR Mode On? -> Press the Button
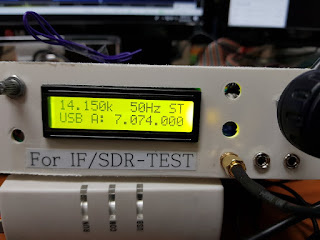
9.Enjoy playing uBITX with SDR
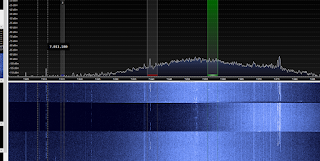
10.Next
The reason I chose SDR-Radio for my first posting on uBITX and SDR connections is that it is easy to apply to most firmware that supports CAT communication as well as my firmware.
I used the $ 8 low-cost RTL-SDR. Digital communication as well as general communication is possible. Using the IF to connect to the SDR for computers was limited to most expensive HF radios.
In particular, SDR-Radio can receive multiple frequencies at the same time.
Wsjt-X receives FT8 and I can receive CW.
The following post is an application of SDR-Radio.
I will post SDR #, Linux, or Raspberry based SDRs in order.
11.Why did I put the SDR connection point there?
I looked for a way to connect SDR to uBITX.
Most people used the SDR connection point following a 45Mhz filter.
It is a great way and is the only way to connect SDR.

The purpose of connecting the SDR was probably to see the spectrum.
But the test result was too weak. If the purpose of connecting the SDR to the uBITX is to see the spectrum, it could be used, but the SDR could not be used as the main receiver.
So I chose the front of the 12Mhz filter, which is amplified once more.
But the signal here is around 12Mhz, which is not available with RTL-SDR.
I decided to put 12Mhz at a good frequency to connect to the SDR and instead use the speakers instead. Of course, when SDR Mode is off, you will hear the sound from the speaker again.
The second reason I chose this place is to make it a little more convenient for most SDRs that do not support IF and Linux-based SDRs.
It is to change the frequency connected to the SDR so that the frequency can be easily read in the SDR software.
The other candidates were Sound Out, 12Mhz after the filter passed.


Deeply taken by surprise Ian.
ReplyDeleteGreat idea.
Indeed a very pleasant surprise.
73 de Konstantinos, SV1ONW
Konstantinos.
DeleteThanks, I will test it on Linux or Raspberry pi in a few days, maybe some people can change uBITX to SDR-HF with Raspberry Pi Zero at low cost.
That was my goal this time.
Ian KD8CEC
Awesome. What is that bulge?
DeleteC32 and R37 on the schematic are interchanged in the picture. R37 is where C32 is shown on the schematic and vice versa. To use the SDR with the Ubitx, do I need to do this modification to connect the SDR?
ReplyDeleteYes. I also confirmed that the schematic was wrong.
DeleteYou can just ignore it.
Connecting to C32 will work well.
Ian KD8CEC
Which RTL or SDR you connect to the UBITX?
ReplyDeleteI order my kit now, i got impressed by your setup
73! LB3RE
Thank you for your interest.
Deletei using rtl-sdr
https://www.ebay.com/sch/sis.html?_itemId=null&_nkw=USB+R820T+DVB+T+RTL+SDR+Realtek+RTL2832U+Digital+HDTV+Tuner+Receiver+Black&_trksid=p2047675.m4100.l9146
I use $ 8, but if you can buy a cheaper one, it can also be used.
I am looking for something a little smaller.
Ian KD8CEC
Ian... I think with just a simple 20dB IF amplifier (high frequency op amp) just for the SDR you could get this to work at the 45MHz level very easily.
ReplyDeleteWilliam Schmidt.
ReplyDeletePefect!!! Great idea.
I failed to get a signal on the 45Mhz IF section. (Too weak)
Let me know if it succeeds !! I wish you a great success. I will follow soon.
Good idea thank you.
Ian KD8CEC
SM0JZT had success using a kit from G4HUP. See https://ubitx.net/2018/07/21/full-sdr-receive-with-g4hup-buffer-amp/ and https://groups.io/g/BITX20/message/54410 for some notes, and https://www.sdr-kits.net/Panoramic-Adaptor-Tap-Boards for the amplifying tap board.
DeleteThanks for the writeup. It helped me figure out that wide-spectrum isn't available on the IF (12MHz in v3&4, 11.052MHz in v5, and the 30MHz IF mode you use here) since the signal is filtered down to only 15kHz bandwidth after the 45MHz IF.
SDR function a Great add-on !!
ReplyDeleteI have an upconverter (100mhz) and a rtl dongle.
Using this provides a much wider bw and even gain...
I attach the input to the converter to my antenna (for a test)
output goes to rtl sdr dongle.
I was wondering what SDR settings i would use: (in ubitx manager)?
sdr offset freq? Should I enter 0 or the upconverter freq (100mhz)?
sdr frequency mode? 0 or 1 or 2 or 3?
and on the sdr radio pgm :
what radio configuration - offset frequency or direct antenna?
I presume its direct antenna
My converter is 100mhz offset
Thanks again
Your work is much appreciated...
Joe
VE1BWV
Joe How are you?
DeleteI connected the SDR to the IF because it was aimed at improving the receiving function of uBITX. And I did not have an Up Converter. :)
SDR mode and SDR Offset are used to connect SDR to the IF output.
Maybe you do not need SDR mode and SDR Frequency Offset setting.
You just set the offset in SDR software to -100Mhz.
If you are not satisfied with the reception performance, try connecting to IF Output.
Ian KD8CEC
Hi Ian, I have one of these... https://www.rtl-sdr.com/wp-content/uploads/2018/02/RTL-SDR-Blog-V3-Datasheet.pdf .....and would like your opinion on it's viability to use with the uBitx.
ReplyDeleteI've used it purely as an RX and it seems to work with Linux running CubicSDR very well.
If you could elaborate on the specifics of using it, as well as a uBitx manager to use under Linux, it would be greatly appreciated.
Thanks, Rick - KJ4ICG
This comment has been removed by the author.
ReplyDeleteThis comment has been removed by the author.
ReplyDeleteHello Dr. Lee
ReplyDeleteMy name is Lee Kon-Chol DS4HDW in Korea.
I also bought two RTL-SDR sets to connect with ubitx. One is Ver.3 and the other is the same as yours.
Could you please show me where to connect RTL-SDR directly to ubitx circuit board? Because the RTL-SDR has a SAM-F and an USB connector instead of an SMA-M connector and you haven't uploaded your RTL-SDR connection picture, so I think that the picture and diagram you upload shows you the SAM-F connector for external antenna connection. I think the way and location you connected are shown. It is very hard to find SMA-F TO SMA-F cable in Korea, so I would like to know if you made your own SMA-F TO SMA-F cable to connect RTL-SDR to ubitx.
Also, I have a question about connecting the USB cable. Did you use a USB hub for RTL-SDR, RADUINO, and IS2 ARDUINO NANO connections? Or did you connect it to your computer with a separate USB cable for each of those devices?
I'm sorry, can you show me a picture of the RTL-SDR connected to the ubitx board and a picture of the USB cable connected to each device and computer?
I'm new to electronics, so I don't know much. Sorry for the stupid questions.
In the writeup above, step 4.3 option 3 looks like it should be "3.SDR Offset Frequency + kHz unit." instead of "3.SDR Offset Frequency + Mhz unit."
ReplyDeleteThat would be different than the step 4.3 option 2 sub-heading , and would match the screen shot and the text better.
De. Lee,
ReplyDeleteIt has been a while since I have commented on any of your uBitx mods. But I just recently acquired a uBitx V4 and the person I got it from did this modification and he included the RTL-SDR dongle with the uBitx. What I am curious about, if you have this hooked up to the uBitx you can’t transmit while it is hooked up correct????
I hope you will reply!! I can’t find anything out about that anywhere.
Your friend
Juddie, WD8WV
This blog is very effective and valuable. I am very glad to read your blog. I hope you will soon share your next post about this discussion. Thanks for sharing and keep sharing.
ReplyDeletegallery wrapped canvas
I visited a lot of website but I believe this one holds something extra in it.
ReplyDeleteAlso visit my web-site; 오피
Very nice article and straight to the point. I don’t know if this is truly the best place to ask but do you folks have any idea where to get some professional writers? Thank you. 토토
ReplyDeletewhoah this weblog is excellent i really like reading your articles. 바카라사이트
ReplyDeleteStay up the good work! You know, many people are looking round for this info, you could aid them greatly. 토토
ReplyDelete
ReplyDeleteThanks for sharing this.,
Leanpitch provides online training in Scrum Master, everyone can use it wisely.
Join Leanpitch 2 Days CSM Certification Workshop in different cities.
certified scrum master certification
agile scrum master certification
CSPO online certification
ReplyDeleteCSPO TRAINING ONLINE
CSPO ONLINE TRAINING
ReplyDeleteCSPO ONLINE
ReplyDeleteExcellent content ,Thanks for sharing this .,
Online teaching tools
Virtual classroom setup
Skills for online teachers
Excellent content ,Thanks for sharing this .,
ReplyDeleteLeanpitch provides online training in CSPO, everyone can use it wiselyCSPO online certification
CSPO TRAINING ONLINE
the External Radio button. Essay Champ The program will be restarted and the following screen will appear.
ReplyDeleteI feel so grateful while reading your article. Because you are delivering such reasonable information as I see, thanks for this Attractive post.
ReplyDeleteac tractor price
Its an lovely and instructive content.
ReplyDeletelatest tractor
I really like all your blog posts.
ReplyDeleteRear Tractor Tyre
You can download the yo whatsapp latest version to share this handsome guy!
ReplyDeletenice article thanks for sharing
ReplyDeletePowertrac Tractor
Message is very informative! This article contains a wealth of knowledge that can support any company in launching a fruitful social media campaign.
ReplyDeleteWe Provide a Data Science Courses in Noida
https://skillslash.com/data-science-course-in-noida
Great post! watering can are a must-have for any gardener, and your article highlights the importance of choosing the right one.
ReplyDeleteI just built my uBITX v6, and am planning to upgrade to a 3.8 inch Nextion display, and add an RTL-SDR device, internally. The plan is to use a retired cell phone running. SDRAngel as a pan-adapter.
ReplyDeleteRTL-SDR can only receive more than 24MHz, so you will need to make some small modifications to the source code if you are not using CEC Firmware version 1.070 or later. Visit concrete driveway team!
ReplyDeleteGreat insights! It’s fascinating to see how users are connecting SDR to uBITX, especially with the support of CEC Firmware. This kind of innovation reminds me of the creativity involved in designing corporate and promotional gifts or corporate logo gifts finding new ways to enhance functionality and appeal. I’m sure hardware experts will continue to push the boundaries even further. Keep sharing your knowledge!
ReplyDeleteWith a variety of workouts that focus on various muscle areas, Park Exercise Equipment are vital resources for outdoor fitness aficionados. If you want to improve your strength, flexibility, or endurance, these outdoor gym installations are a great substitute for inside exercises. They are frequently referred to as the king of gym equipment because of their amazing results, durability, and versatility, which make them the perfect option for anyone looking to keep in shape while taking in the outdoors.
ReplyDeleteWow, this is fascinating reading. Great job on this content. I liked it a lot. Thanks for the great and unique info. Indo Farm Tractor
ReplyDelete