How to use Voice Keyer in EU1KY with CEC Firmware V0.7
Version 0.7 is being prepared for deployment.
Voice Keyer (or Voice Recorder) function was added in Version 0.7.
If you only want to use it as a voice recorder, you do not need any modifications, Just need update the firmware.
If you want to use it as a Voice Keyer, you need a very simple modification.
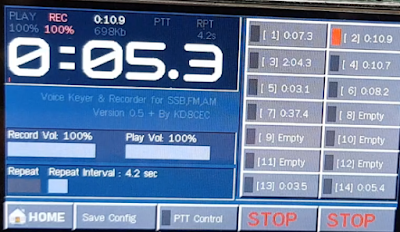
1.Modifications for use as a voice keyer
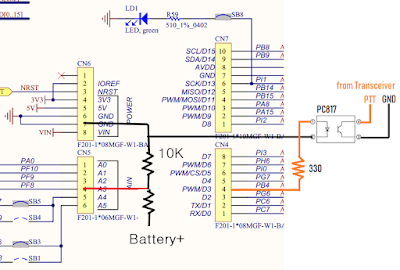
1.1 PTT Control
Below is just one example.
Only the part with PC817 is shown below.
1.2 MIC Input
It uses a push switch to switch between microphone and AA.
It is recommended to pass a small transformer between the transceiver and the AA.

Please use only one (Left or Right) because the speaker jack of AA is stereo.
Recording and playback will operate in stereo. You can use either the left or the right one for you.
2.How to use Voice Keyer
2.1 Use Voice recorder
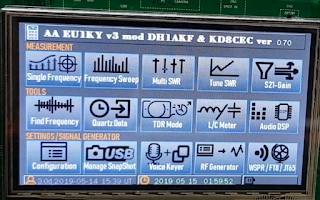
Touch the 'Voice Keyer'
The 'USB Host' menu has been moved to the Configuration section.
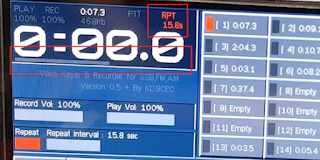
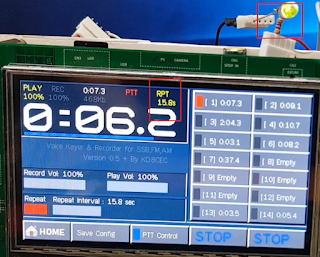
The screen below is the Voice Keyer screen.
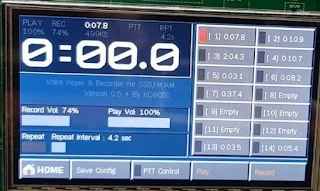
A: Display Window
B: Slot buttons
C: Volume adjust
D: Repeat enable and Repeat (rx time) adjust
E: Menu buttons
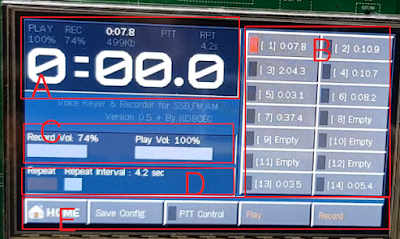
Select one of the Slot buttons on the right to select the Slot you will use.
Up to 14 slots can be used.
Touch the 'Record' button on the bottom right to record to the selected Slot.
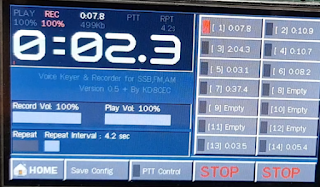
When recording is completed, touch 'Stop' button.
The number of text in the Slot button changes as shown below. this is Play Time of the recorded file.
The display window shows the play time of the selected Slot.
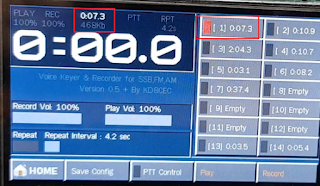
To record to slot2, select the Slot2 button and touch the Record button. When recording is completed, touch 'Stop' button.

To play the recorded file, touch the 'Play' button.
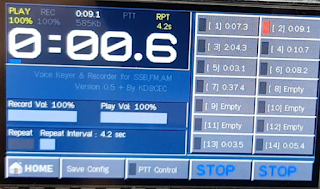
To play the recorded file of another Slot, select Slot and press 'Play' button.
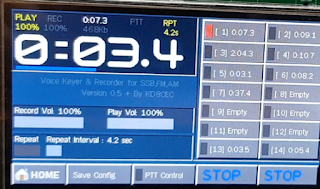
2.1 Use Voice Keyer
If you have recorded a 'CQ' Message, you can transfer it to your transceiver.
At this time, it must be modified for PTT control.
Select the Slot where your 'CQ' message is recorded.
Touch the 'PTT control' button to activate the 'PTT' function.
Touch the "Play" button. The 'CQ' message you recorded will be sent over the transceiver.
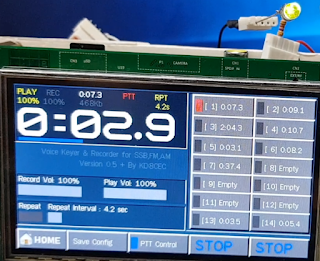
If you want to continue sending 'CQ' until the other station answers, touch the 'Repeat' button to activate the 'Repeat' function.
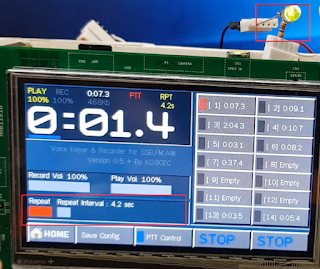
After 'Play', wait for 'Repeat Delay' time and resend.
The progress bar will move in gray color.
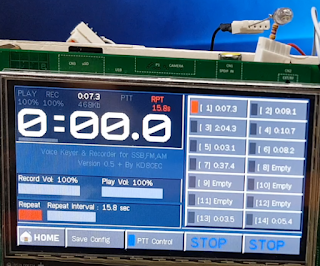
You can set the Repeat Delay Time (RX Time) to check the response of the other station.
Thanks for reading.
Ian KD8CEC
Version 0.7 is being prepared for deployment.
Voice Keyer (or Voice Recorder) function was added in Version 0.7.
If you only want to use it as a voice recorder, you do not need any modifications, Just need update the firmware.
If you want to use it as a Voice Keyer, you need a very simple modification.

1.Modifications for use as a voice keyer
1.1 PTT Control
Below is just one example.
Only the part with PC817 is shown below.

1.2 MIC Input
It uses a push switch to switch between microphone and AA.
It is recommended to pass a small transformer between the transceiver and the AA.

Please use only one (Left or Right) because the speaker jack of AA is stereo.
Recording and playback will operate in stereo. You can use either the left or the right one for you.
2.How to use Voice Keyer
2.1 Use Voice recorder
Touch the 'Voice Keyer'
The 'USB Host' menu has been moved to the Configuration section.

The screen below is the Voice Keyer screen.

A: Display Window
B: Slot buttons
C: Volume adjust
D: Repeat enable and Repeat (rx time) adjust
E: Menu buttons

Select one of the Slot buttons on the right to select the Slot you will use.
Up to 14 slots can be used.
Touch the 'Record' button on the bottom right to record to the selected Slot.

When recording is completed, touch 'Stop' button.
The number of text in the Slot button changes as shown below. this is Play Time of the recorded file.
The display window shows the play time of the selected Slot.

To record to slot2, select the Slot2 button and touch the Record button. When recording is completed, touch 'Stop' button.

To play the recorded file, touch the 'Play' button.

To play the recorded file of another Slot, select Slot and press 'Play' button.

2.1 Use Voice Keyer
If you have recorded a 'CQ' Message, you can transfer it to your transceiver.
At this time, it must be modified for PTT control.
Select the Slot where your 'CQ' message is recorded.
Touch the 'PTT control' button to activate the 'PTT' function.
Touch the "Play" button. The 'CQ' message you recorded will be sent over the transceiver.

If you want to continue sending 'CQ' until the other station answers, touch the 'Repeat' button to activate the 'Repeat' function.

After 'Play', wait for 'Repeat Delay' time and resend.
The progress bar will move in gray color.

You can set the Repeat Delay Time (RX Time) to check the response of the other station.


Thanks for reading.
Ian KD8CEC
No need Mic to record ?
ReplyDeleteinternal mic recording ?
yes there is an internal mic
ReplyDeleteMay 17, Voice Keyer or Voice Recorder function was added in Version www.retainingwallssacramentoca.com/
ReplyDeleteI've been a dedicated reader of your blog for some time now, and your content consistently exceeds my expectations. Please continue to produce such exceptional work! Insulation Repair Services
ReplyDeleteInsulation Repair Services
Unlock the power of the Voice Keyer in EU1KY with CEC Firmware V0.7 for seamless communication. Whether you're a ham radio enthusiast or tech aficionado, mastering this feature enhances your radio experience. And when academic tasks demand precision, leverage tools like the GPA calculator UF to stay ahead in your studies.
ReplyDeleteAt Pathania ENT Clinic, we offer expert diagnosis and treatment for issues such as hearing loss, sinus problems, voice disorders, and more. Our state-of-the-art facility is equipped with cutting-edge medical technology to ensure the best possible care for our patients.
ReplyDeleteWe are attached to leading hospitals for inpatient care which includes medical and surgical mangement of all ENT disorders.
ENT doctor for adults in Gurgaon
You just need to upgrade the firmware if your only intention is to use it as a voice recorder. No further modifications are required. Check concrete company!
ReplyDelete"Using the Voice Keyer in EU1KY with CEC firmware can enhance your communication setup by automating voice transmissions. It’s a great tool for amateur radio enthusiasts looking to streamline operations. For students balancing technical hobbies with academics,UK Assignment Writing Services can help manage their workload effectively."
ReplyDeleteWe provide best laptop repair service in Gurgaon at affordable prices.
ReplyDeleteThat’s a really helpful guide! The Voice Keyer feature in EU1KY with CEC Firmware V0.7 makes operating so much easier, especially for hands-free communication. I appreciate how clearly it’s explained here. In a similar way, the tiger exchange cricket gaming platform focuses on smooth performance and user-friendly design giving players an exciting and seamless gaming experience with real-time updates and reliable control.
ReplyDeleteAir Force Blues Occupational Badge – How to Wear It & Where to Buy It
ReplyDeleteLearn the correct way to wear the Air Force occupational badge on Blues, including placement height, spacing, and regulation requirements. Discover the difference between regular and custom occupational badges, options for personalized designs, and trusted places to buy high-quality versions. Also includes info on badge rules, how to attach them, and whether the EFMB is authorized for wear. rush patch dot com
Inside Florida’s Boldest Education Experiment Yet
ReplyDeleteThe Fallen Angel Shovels for Reading offer a powerful and engaging experience, pulling you into a story filled with depth and intrigue the way the narrative unfolds keeps readers hooked and eager to explore every detail for those who love reading while traveling, staying connected makes the experience even better a Travel eSIM Italy Italy Italy is perfect for accessing ebooks, reviews, and discussions without worrying about roaming issues it’s a simple way to enjoy great reads and seamless connectivity wherever your journey takes you.
ReplyDelete