Use CEC version firmware 0.25 or later of uBITX.
The following examples are based on version 0.27.
We will post the 0.27 version as the test ends.
All of the examples below only describe connections to uBITX.
Please refer to the manual or other documents for how to use the program.
uBITX Firmware 0.27 :
http://www.hamskey.com/2018/01/release-version-027-of-cat-support.html
1. fldigi
Download : https://sourceforge.net/projects/fldigi/
After installing the program, connect the uBITX USB to the computer.
If you installed fldigi for the first time, the following screen will appear.

Click Configure -> Rig control

Select 'Hamlib' Tab

Select Rig : Yaesu FT-817 (Beta)

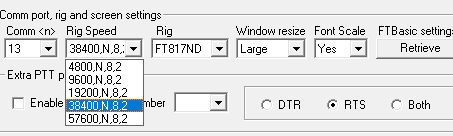
Select your comport and set baud rate to 38400

Select seideband type

All settings are as follows.

Finally, check Use hamlib.

After setting fldigi, it is necessary to restart the program.
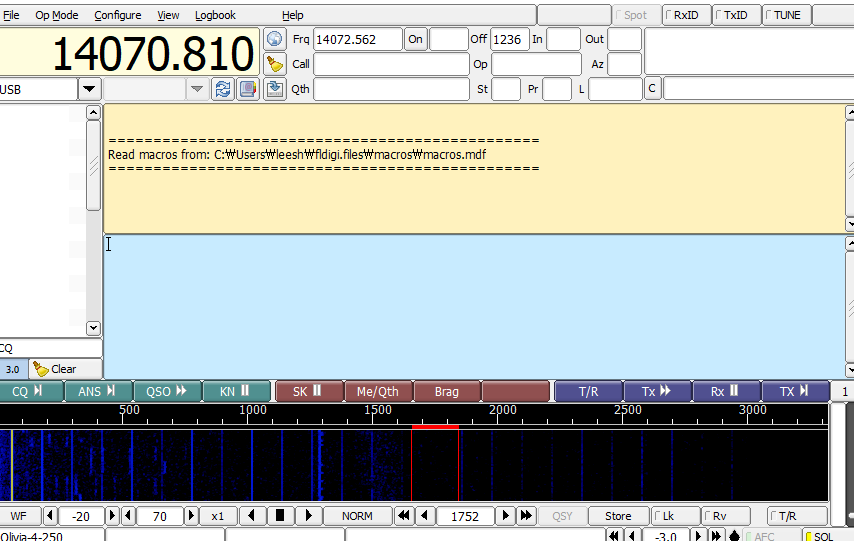
The following shows the frequency by communicating with uBITX after restarting the program.

If you click the T / R button, uBITX will switch to TX mode with the signal.

2. FTBCAT
Download : http://www.g4hfq.co.uk/
After installing the program, connect the uBITX USB to the computer.
If you installed fldigi for the first time, the following screen will appear.

Click Option -> Settings...

Set it as follows.


FTBCAT is a program that mainly manages memory, but uBITX has no memory to manage, so it can only view frequencies.
Click the OK Button

Click the On/Off button, then start communication with uBITX

You can see uBITX information on FTBCAT screen.

Change Band by Band buttons


Vfo Toggle by VFO A/B

The settings in the raspberry pie are the same.
The video below is a video that I tested on Windows and Raspberry.
73
Ian KD8CEC
The following examples are based on version 0.27.
We will post the 0.27 version as the test ends.
All of the examples below only describe connections to uBITX.
Please refer to the manual or other documents for how to use the program.
uBITX Firmware 0.27 :
http://www.hamskey.com/2018/01/release-version-027-of-cat-support.html
1. fldigi
Download : https://sourceforge.net/projects/fldigi/
After installing the program, connect the uBITX USB to the computer.
If you installed fldigi for the first time, the following screen will appear.
Click Configure -> Rig control

Select 'Hamlib' Tab

Select Rig : Yaesu FT-817 (Beta)

Select your comport and set baud rate to 38400

Select seideband type

All settings are as follows.

Finally, check Use hamlib.

After setting fldigi, it is necessary to restart the program.
The following shows the frequency by communicating with uBITX after restarting the program.

If you click the T / R button, uBITX will switch to TX mode with the signal.

2. FTBCAT
Download : http://www.g4hfq.co.uk/
After installing the program, connect the uBITX USB to the computer.
If you installed fldigi for the first time, the following screen will appear.

Click Option -> Settings...

Set it as follows.

FTBCAT is a program that mainly manages memory, but uBITX has no memory to manage, so it can only view frequencies.
Click the OK Button

Click the On/Off button, then start communication with uBITX

You can see uBITX information on FTBCAT screen.

Change Band by Band buttons


Vfo Toggle by VFO A/B

The settings in the raspberry pie are the same.
The video below is a video that I tested on Windows and Raspberry.
73
Ian KD8CEC
Hey Ian...what cable is used to connect the PC to the uBITX for digital operation? Maybe I'm not reading closely enough.
ReplyDeleteJohn KB2HSH
John
ReplyDeleteI know you asked this over a month ago, but don't see any answer. As far as I can tell (and I can easily be wrong) it is the normal USB programming cable from the computer to the arduino.
what other cable could it be???
ReplyDeleteLaptop Screen Replacement in Mumbai | Hp Laptop Screen Replacement Malad | Dell Laptop Battery Replacement in Mumbai | Hp Laptop Charger Replacement in Mumbai | Laptop Repair in Charkop, Kandivali West | Laptop Repair in Goregaon West | Laptop Repair in Kalina, Santacruz East | Laptop Repair in Oshiwara
ReplyDelete