uBITX with Nextion LCD (CEC Firmware) - Installation and Introduction
uBITX CEC Firmware supports various LCD since Version 1.08 (16x02 Parallel, 20x04 Parallel, 16x02 I2C, 20x04 I2C, 16x02 Dual LCD with I2C).Supports Nextion LCD (Graphic LCD) from Version 1.09, Version 1.09x is primarily aimed at Nextion LCD support. Also 1.09x will continue to be Beta version. If you want a stable version, please use 1.08 or 1.1 version to be released in the future.
Version 1.097 has been released.
http://www.hamskey.com/2018/08/ubitx-firmware-cec-version-1097beta.html

1.About uBITX with Nextion LCD
Two firmware are required to connect Nextion LCD to uBITX. One will upload to uBITX and the other will upload to Nextion LCD.
The video below contains most of the examples in this article.
1.1 uBITX firmware for Nextion LCD
uBITX firmware has released .Hex files for various LCD since 1.073Beta version as below
Since Version 1.091, uBITX Firmware release .Hex files with file names ending in _NX.hex.

The file name ends with _NX.hex is uBITX firmware for Nextion LCD.
1.2 Nextion LCD GUI Firmware for HF Transceiver (uBITX)
Nextion LCD has various kinds from 2.4 "to 9", CEC Firmware Version 1.092 Beta provides three types of GUI firmware.
Template files , GUI Source files and precompiled GUI Firmware.
You can choose one of these.
Blue box : Template file
Red box : GUI source
Yello box : compiled GUI Firmware

Do you use Linux or MAC?
Or Are you not interested in Nextion LCD development?
Or are you interested in uBITX firmware or hardware Mod rather than Nextion LCD GUI?
(I belong to this category, The GUI work was the hardest until I tried Nextion LCD)
You can use precompiled files. Files whose file extensions end with .tft
Will you modify existing GUI in Windows and create your own GUI?
Or are you interested in developing the Nextion LCD GUI?
You can use precompiled files. The file name ends with _Number.hmi (ex : ubitx_24.hmi, ubitx_28.hmi)
You can use template files. The file name ends with _TempNumber.hmi (ex : ubitx_Temp24.hmi, ubitx_Temp28.hmi)
You can build your own GUI in a simple way.
Template files support all versions.
Some beta testers have begun to create GUIs for 3.2 ", 3.5" and more by modifying the 2.4 "GUI, Perhaps a variety of GUIs are expected to be shared.
2.Uploading firmware to uBITX
Maybe you have experience uploading firmware to uBITX. You can do it the way you did.
If you are uploading firmware to uBITX for the first time, please refer to the link below
http://www.hamskey.com/2018/01/how-to-upgrade-ubitx-firmware.html
The LCD used in uBITX below is the same as the one included in uBITX purchase
Check if uBITX is working normally

Download the firmware file.
If version 1.092 or later is released, you can download it

Extract the downloaded .zip file

After Extract, the following files are displayed

Run X-Loader

Select the .Hex file (file name xxx_NX.hex)

Select the Com port

Click the 'Upload' Button

When the upload is completed, the LCD will not work normally

Remove the Character LCD

3.Uploading GUI Firmware to Nextion LCD
Prepare a Micro SD-Card

Download Nextion LCD Firmware.
If version 1.092 or later is released, you can download it
Select the file that matches your LCD resolution among the downloaded files.
I chose ubitx_24.tft because it uses 2.4 "

Copy the file to Micro SD-Card
Right click -> Click the Copy

Right Click -> Click the Paste

The .tft file has been copied to the Micro SD-Card as shown below.
Please note that only one .tft file is required. If the file does not match the resolution, or if there are two or more files, an error occurs.

Insert the SD-Card into the Nextion LCD

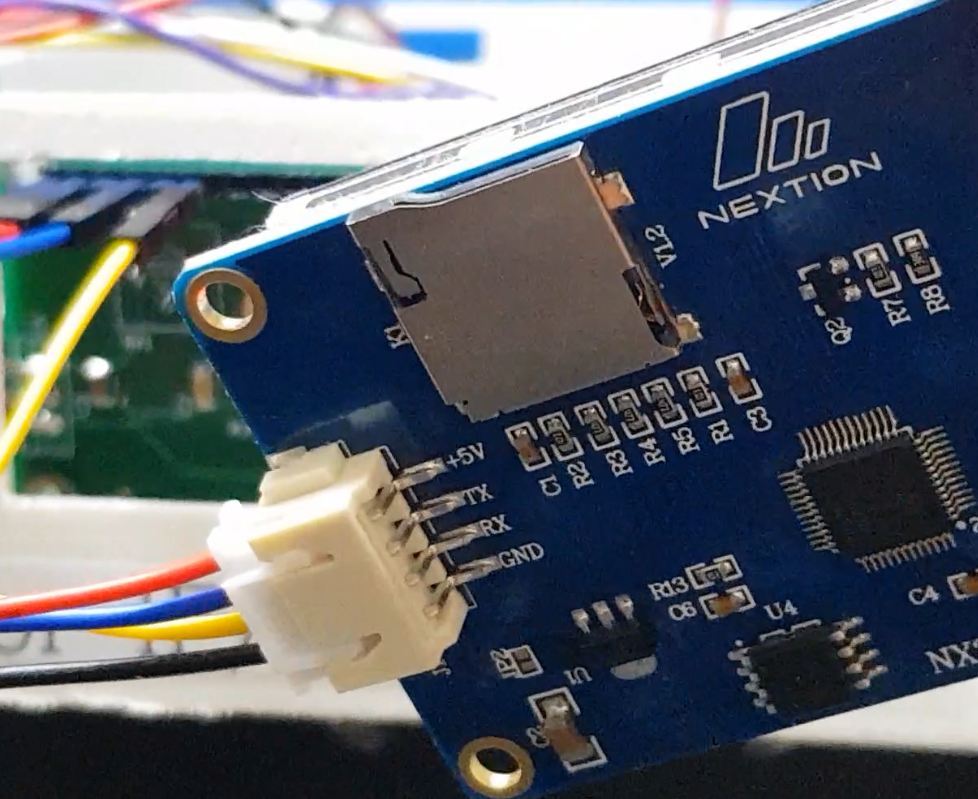
Connect Nextion LCD to uBITX
You do not need any hardware modifications to use the Nextion LCD
You can connect only 4 wires to the place where the LCD is removed as shown below.

Below is my uBITX with Nextion LCD connected
I used the cables included in my Nextion LCD purchase
You should connect the cable as short as possible after the test.
The sound generated during communication between uBITX and Nextion LCD, It is also recommended to shield the Nextion LCD if possible.
However, I use it as it is because I am not sensitive and need to experiment frequently.

Nextion When power is connected to the LCD, the following message will be displayed.

If you wait a bit, it will update quickly

All updates are complete.

Remove the SD-Card from Nextion LCD. Must be removed. If not, may be Nextion LCD always update.
Easy?
In the future, if you find a better GUI for uBITX, you can change the GUI by just copying the file. I hope that.
I saw Nextion LCD use in DMR communication. They seemed nice to share GUI firmware with each other.
If you want to know more about the Nexion LCD with amateur radio, you can study on the Nextion LCD and Amateur radio on facebook. I studied various ways to use it
Now power off uBITX

Power on uBITX
4.Basic of uBITX with Nextion LCD
Maybe your uBITX will look like this. This is a GUI created to verify the template file.
Since uBITX users are mostly engineers, I think that various GUIs will appear soon.

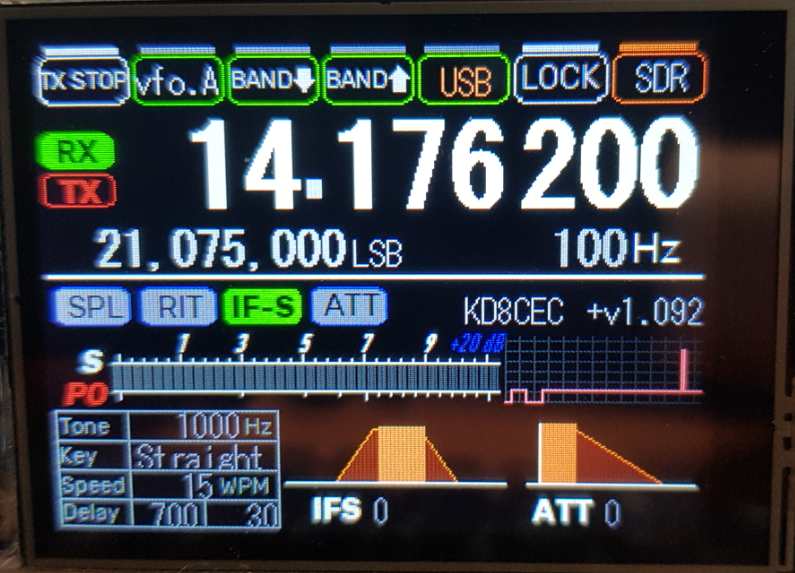
Marked A ~ Y in the figure below
A: Active VFO Frequency and Touch Pannel for Frequency Input Mode
B: TX / RX Status
C: TX Stop Status and Touch Button
D: Active VFO and Touch Button
E: Band Down Touch Button
F: Band Up Touch Button
G: Active VFO Mode and Touch Button
H: Dial Lock Status and Touch Button
I: SDR Mode / Speaker Mode Status and Touch Button
J: Sub VFO Frequency
K: Sub VFO Mode
L: Dial Step Value
M: Split Status and Touch Button
N: RIT Status and Touch Button
O: IF Shift Status and Touch Button
P: ATT Status and Touch Button
Q: Displayed Your Call sign
R:uBITX Firmeare Version Number (not Nextion GUI Version)
S:Signal Meter
T:Signal History
U:Information Pannel for CW and Touch for alternate functions
V:IF Shift Value status and Slide
W:IF Shift Value (number type)
X:ATT Value status and Slide
Y:ATT Value (number type)

Press the PTT, The RX / TX status has changed

Touch the 'TX Stop' button

Press the PTT, Actually, radio waves are not transmitted

Touch the 'Vfo A Button' Button, Changed the Active VFO

Touch the 'Band Down' button
Please use the uBITX manager to set up your ham band

touch the 'Band Up' button

Touch the 'Mode Button', You will probably see the available modes
Touch the 'CWL' Button.

Changed active VFO Mode

Touch the 'Lock' button (Dial Lock),
Turn the Dial (Encoder), The Frequency will not change
Touch the 'Lock' Button Again, Back Unlock mode

Touch the 'SPK' Button (SDR Mode Button), Changed SDR Mode
Touch the Split Button

Press the PTT, It will be transmitted from another VFO

Touch the 'RIT' Button

Press the PTT, RIT effect does not appear

Release the PTT and Change the Frequency

Press the PTT, Transmit at the RIT frequency
Click the 'IF-S' Button (IF Shift), You will see a Slide where you can change the IF Shift value

Move the IF Shift slide. It will be reflected when the touch is released.

Touch the 'IF-S' Button again, disabled the IF Shift Mode

Click the 'ATT' Button, The ATT value is automatically set to 70. Moving the ATT slide will change the receiver sensitivity

Touch the Active VFO Frequency that 14.074000 is displayed.

5.Frequen Panel
frequency input panel, Refer to the link below for frequency input panel.
http://www.hamskey.com/2018/06/how-to-use-nextion-lcd-3-practice-for.html

First input method. Use the numeric keypad to enter the frequency.
When the desired frequency is input, touch 'ENT' button.

The second method, '.', Is used
Mhz and enter '.' Touch the button
If you want to enter 7.070000 Mhz, press '7' and press '.'
The numeric position will move as shown below

When the desired frequency is displayed, press 'ENT'.
Example)'7', '.', '0', '7', 'ENT'
Third method, Input Band Frequency. It is possible to set the center frequency of the Ham Band according to the user's opinion.
Press the 'Shift' Button. Most Key Pad colors will change
Press the '14' (or 5) Button

changed the Frequency to 14.000000Mhz

Fourth Method, Try moving the slides.
Probably the frequency will change as a larger unit.

I intended it. Use the dial to fine tune the frequency. You will be able to adjust the desired frequency fairly quickly using this method.

Fifth Method, Touch on the large number with frequency.
Touch the top of the number to increase it, and touch the bottom to decrease it
I like Ham Radio Deluxe Software. Its motif from Ham Radio Deluxe.

6.Text Mode
- Some users may prefer the traditional way of uBITX control, I like how to set up all the menus with only one switch of uBITX.
- Many functions in the CEC Firmware can not be GUI.
So I decided to emulate the character LCD. I decided to call it Text Mode.
The appearance of the existing uBITX with Character LCD is displayed as is
Of course, most of the settings can be done in uBITX Manager. But you do not need to turn on your computer to change CW Side Tone.
Press the Function Switch on uBITX, You will probably see a screen that you are familiar with.

Turn the Dial, Press the Function Switch

Change Mode, The changed mode is immediately displayed in the GUI

Change the CW Tone

to 1000 Hz

The changed Side Tone will be displayed on the CW information panel below.

Try IF Shift changes. The graph at the bottom will change together

Try ATT changes. The graph at the bottom will change together


Press and hold Function Siwth to change Tuen Step

Turn the dial until the desired Step appears. The Tune Step List can be set in uBITX Manager.

The video below contains most of the examples in this article.
(This is the same as the video at the top of this post)
Thank you for reading.
Ian KD8CEC
Thanks for sharing all this new developments for ubitx owners.
ReplyDeleteBest 73’ Ton - PA1PXL
Thank you for your interesting
DeleteI have a display here, and I thought I had picked it up for eventual rasberry pi use with your system. But, it might be larger ? says NX4024T032_11 on the back. Is this a touch screen fitting your software ?
ReplyDeleteYour LCD is probably a 3.2 "Basic model. I have the same model. I'm still officially releasing only 2.4 "and 2.8" GUIs.
DeleteHowever, I will simply convert and distribute the 2.8 "for 3.2" users.
There will be a blank space on the right (80 pixels), but there is no problem in using it.
There is a second option. Beta testers are already converting to various sizes. You can use it.
There is a third method. Nextion GUI development is very interesting. You can do it yourself. For ease of development I have prepared a Template file. The template file supports LCDs of all sizes.
is it possible to use the display as an external add on in addition to the stock 2 x 16? for those of us who have already invested in an enclosure.
DeleteHi Ian, thanks for the great software and extra functionality for this great radio. Can I ask a question regarding the Nextion display? Can the Nextion display be added to the Ubitx as a second display leaving the original supplied display as well?
ReplyDeleteSteve
Steve
DeleteUnfortunately, that's impossible. It is difficult to use together because it uses the GPIO used by the conventional LCD.
Ian KD8CEC
Very impressive work! Some years ago I seen the nexion displays but can't immagine these results. Vy 73 de Giuseppe, IK8YFW
ReplyDeleteNextion LCD is very easy to use. You'll do better than that.
DeleteI've experimented with your DSP, I've got a motif from it and I'm going to make another fun thing.
Ian KD8CEC
I'm glad to read this, Ian, I got also a new Cortex m4 cheap module and I'm studing it now.
DeleteI'll wait your good news.
Best 73, Ik8yfw, Giuseppe.
Once again I must say Congratulations to you Ian for your excellent work.
ReplyDeleteI think I've lost count of how many times I have been amazed with your developments.
Great ideas!
73 de Konstantinos, SV1ONW
Thank you for your kind help
DeleteIan
Nice package, and it keeps on getting better and better.
ReplyDeleteGreat features and one of the best displays!
Thanks for all your hard work!!
Joe
VE1BWV
Thanks for helping me
DeleteI will often ask for your help in the future
Ian
Hi, congratulations to you Ian for your excellent work...!!! I'd like to know which display i've must to buy for try your Firmware, have some link in Amazon or eBay? Many Thanks.
ReplyDeleteIs possible to use this model?
https://www.amazon.it/UNIKEL-Nextion-display-touchpanel-ESP8266/dp/B008RU8WAK/ref=sr_1_2?s=electronics&ie=UTF8&qid=1529567189&sr=1-2&keywords=nextion+lcd+2%2C8
73 de IW6CAE
Maybe it will be okay.
DeleteWhat I recommend is the cheapest.
I bought the cheapest in Ali Express and had to wait quite a long time. :)
First, CEC Version supports both English (Nextion)and Chinese (TJC) versions.
Ian KD8CEC
Hi, can use that ?
ReplyDeletehttps://www.ebay.com/itm/253169553120?_trksid=p11401.c100711.m5036&_trkparms=aid%3D111001%26algo%3DREC.SEED%26ao%3D1%26asc%3D20170110121435%26meid%3D463d74f861444e99af1af41fa393b607%26pid%3D100711%26rk%3D1%26rkt%3D2%26mehot%3Dag%26sd%3D253169553120%26itm%3D253169553120&ul_noapp=true
regards from chile
CE3MSB
CE3MSB
DeleteThis LCD is not Nextion or TJC LCD, Nextion LCD use UART but this use SPI protocol,
Not compataible with this LCD, so do not buy this lcd for using on uBITX with CEC firmware.
Thank you
Hi again. I tested three diffeent SD cards until I found an old 4Mb SD-card which I formatted to FAT32. ubitx_35_E.tft file in the card, installed it in the slot and powered on.
ReplyDeleteThe Nextion says 9600 bd, uploading file....
Nothing happens.
So is the card faulted or what am I doing wrong? I don't have a suitable serial to ttl adapter which I could use for downloading.
73
Kai OH3WE
Kai
DeletePlease check if the LCD is supplying enough power. In my case, I recognized any SD card. I upload using the free space of the SD card used by Raspberry Pi.
In my experience, the same symptoms as you did when you limited the current to the LCD.
Please read the link below.
http://www.hamskey.com/2018/06/nextion-tjc-character-lcd-current.html
Ian KD8CEC
Thank you for quick reply. Today I used the small usb-to-2pin adapter which came along with the display. My 5V supply is the same (2.5A) which I use with my RaspPi so it must be good enough.
ReplyDeleteSD update starts but it never ends. What other ways do I have to push the file in?
Kai
An old style 4 gigabytes SD card solved my problem.
DeleteThank you for help.
How to get the display bigger to fill the whole screen area?
Can you please tell if you can use such a display https://al.aliexpress.com/item/2-8-TFT-320x240/32874098075.html?spm=a2g0v.10010108.1000014.3.7c7b36dd9wJVym&scm=1007.13338.98644.000000000000000&scm_id=1007.13338.98644.000000000000000&scm -url = 1007.13338.98644.000000000000000 & pvid = 9c668437-8ee9-4f3a-863b-79cde19011f1 & _t = pvid% 3A9c668437-8ee9-4f3a-863b-79cde19011f1% 2Cscm-url% 3A1007.13338.98644.000000000000000
ReplyDeleteThe screen must be a "NEXTION" screen. A 2.4 inch or 2.8 or 3.2 or larger
DeleteThis comment has been removed by the author.
ReplyDeleteHi Ian. This gentleman uses 1.97 (I Believe) but is also decoding CW ? Does your version do that ? https://youtu.be/iSKb4ZvR6xI His blog (translated by google) https://translate.google.com/translate?sl=auto&tl=en&js=y&prev=_t&hl=en&ie=UTF-8&u=http%3A%2F%2Fforum.hamradio.si%2Fviewtopic.php%3Ff%3D14%26p%3D66455%23p66455&edit-text=
ReplyDeleteHis Blog original http://forum.hamradio.si/viewtopic.php?f=14&p=66455#p66455
I think I've found it, its meantioned on the page for 1.97 beta and says you must have the stand alone signal analyzer for the CW Decode.
DeleteHas anyone converted the 2.8" LCD I2C stand alone signal analyzer firmware to 3,2" If so I would love to get a copy of that .tft file. Thanks, Eric
ReplyDeleteHi guys, I also need the same conversion for my 3.5`` standard nextion display.
ReplyDeleteThanks a lot in advance.
TA2FU Alper
Many thanks Ian. A magnificent description of how to do it. I'm an old tube man, but always willing to learn.
ReplyDelete73 Ray G3SRQ/F5VKX
Hello Jan. I trid with a Nextion NX4024T032_011 (400x240) and it works fine. I notice only that the pictures (320x240) don't fully fill the screen. If I will buy a 480*320 with other HMI will I resolfe? Thank you in advance.
ReplyDelete73 de Renzo - IN3EQZ
Hello Ian,
ReplyDeleteI also have the Nextion 3.2" on my ubitx and I have the problem that the touch function is not working at all. I am only able to access the menu through the main dial, but the LCD doesn't react at all to touch. Could you imagine what could be the reason for that?
I also have no indication of the S-meter, but I suppose I have to wire up the purple wire from digital connector, which is not used right now...
Thanks in advance for your reply.
Conrad
i have both the same problems, the s meter can be set in the manager ,although i have not found settings that give realistic readings yet
Deletethe touch screen is baffling, i dont think its faulty screen, its firmware i think
regards
Conrad, I had a similar problem with my Nextion 2.8 but the touch would work when it was just laying on the table. When I put it in the frame to hold it on the bitx the touch quit working. Found some bumps in the opening that went around the Nextion, those bumps were touching the screen. I took a Dremel and ground of the under side of the frame and then every thing was fine except the "S" meter that is either always 0 or at max.
DeleteHello Ian,
ReplyDeleteI recently upgraded my LCD from Nextion NX3224T024_011 (which works well) to new NX4832T035_011 using ubitx_035.tft. It displays but it does not display full size, i.e. same size with its of 2.4" LCD. What's causing the problem? I'm using CEC 1.1.
Thank you in advance for your help.
Taka
I know there is the antenna analyzer program available, but I am looking for something simpler. Has anyone added a simple internal SWR bridge that can read/bypass via the nextion screen? If so, please help me understand how it is being done. For example: I like the QRP Guys tuning indicator (https://qrpguys.com/tuning-indicator), but would love to rout the led power levels into the Nextion screen rather than use a simple LED.
ReplyDeleteMM3XIA
ReplyDeleteI fitted a 3.2 nextion and am have two distinct problems.
1. the display only fills 3/4 of screen width.
2. i have no touch screen functions
i note that 3 posts back there are 2 comments saying the same
do we have a fix?
is there ANTONE that has a fix for my two probs?
ReplyDelete1. The display size issue is likely because you have not loaded the correct code for your screen size...Your symptoms indicate your using a 2.8 size code
ReplyDelete2. Your serial wires rx / tx may be incorrect --- reversed?
it is not possible to use the wrong display size as the board rejects any incorrect size and the file used was labelled as 3.5 size anyway. If the tx/rx wires were reversed the display would not work at all, it works fine its the touch system that's not working.
ReplyDeleteThe official support for the nextion display is 2.8 and 3.2.
ReplyDeleteUnless something has change only those 2 sizes are directly support by bu KD8CEC.
If you use this code on a 3.5 it will appear smaller and not fill the screen
You need to use special code which have been developed by other hams to work / utilize the full screen.
The nextion will display 2.8 to 7 inch
But any code above 3.2 has to be coded
specifically for the larger screen.
I have the same problem as listed above. Nextion 3.2 Enhanced. I used the UBITXV5_CEC_V1.200_NX.hex file for the Arduino, and the ubitx_32_E.tft file for the Nextion. The screen displayed fits only about 3/4 of the screen and there is about 15mm free space on the right hand side. How can this be happening?
ReplyDeleteTnx a lot for this amazing work.
ReplyDeleteSoon I am also an owner of uBITX (for 90% CW)
and ordered to add:
-AGC
-CW Filter (300/1000)
-Nextion 2.8" TFT Touch
Describe my build up here: http://www.hb9fih.org/?p=p_629&sName=ubitx-2019
73 Erich HB9FIH
Nobody made the firmware for 2x seven segment tm1637 display?
ReplyDeleteI am grateful for this blog to distribute knowledge about this significant topic. Here I found different segments and now I am going to use these new instructions with new enthusiasm. stone
ReplyDeleteHi,
ReplyDeleteJust installed a 5" nextion display on my uBitx. But it gave me some trouble. I used the UBITXV5_CEC_V1.200_NX_S file for the uBitx and the ubtix_50.tft for the nextion.
In the left upper corner (only a quart) the display shows the display, rest is empty. Touch does not work, but i can control the rig with the dail button.
What am I missing
73!
pe1oev
As always your articles do inspire me. Every single detail you have posted was great.
ReplyDeletedata science courses in delhi
Đặt vé tại phòng vé Aivivu, tham khảo
ReplyDeleteVé máy bay đi Mỹ
vé máy bay từ texas về việt nam
vé máy bay hà nội sài gòn bao nhiêu tiền
đặt vé máy bay chu lai đi hà nội
vé máy bay đi huế vietnam airlines
I was pleasantly delighted to discover this blog and what an excellent post it contains. Thank you for sharing.
ReplyDeleteDigital Marketing In Telugu
Wow, this article is fastidious, my younger sister is analyzing these kinds of things, thus I am going to tell her. 해외스포츠중계
ReplyDeleteI really like your work because it meets my expectations.My work is about Custom Mailer Boxes. 바카라사이트
ReplyDeleteGreat post i must say and thanks for the information. Education is definitely a sticky subject. 토토사이트
ReplyDeleteGreat post i must say and thanks for the information. Education is definitely a sticky subject. 토토사이트
ReplyDeleteHowever, is still among the leading topics of our time. I appreciate your post and look forward to more. 먹튀검증
ReplyDeleteEducation is definitely a sticky subject. 파워볼사이트
ReplyDeleteThanks for posting the best information and the blog is very helpful. 안전공원
ReplyDeleteAwesome blog. I enjoyed reading your articles. This is truly a great read for me. I have bookmarked it and I am looking forward to reading new articles. Keep up the good work!
ReplyDeletebusiness analytics course
Excellent material with unique content, and it is really important to be aware of blog-based material.
ReplyDelete1000 Social BookMarking Sites List
very informative blog
ReplyDeleteartificial intellingence training in chennai
It is extremely nice to see the greatest details presented in an easy and understanding manner.
ReplyDeletebest data science institute in hyderabad
I'm using a Stone monitor. https://www.stoneitech.com/
ReplyDeleteAwesome content. Thanks for sharing.
ReplyDeleteBest Web designing company in Hyderabad
Best Web development company in Hyderabad
Such a very useful information!Thanks for sharing this useful information with us. Really great effort.
ReplyDeleteai courses in aurangabad
Extraordinary blog really goes out of it's way to write descriptive content that helps readers to explore themselves. I hope they continue producing posts of this nature as well. Thank you!
ReplyDeleteArtificial Intelligence Training in Hyderabad
Artificial Intelligence Course in Hyderabad
WOW just what I was searching for. Came here by searching
ReplyDeletefor snow online
My homepage: 안마
I can set up my new idea from this post. It gives in depth information. Thanks for this valuable information for all 에볼루션카지노
ReplyDeletesatisfied to go to your blog, i am by way of all money owed ahead to more reliable articles and i suppose we as an entire wish to thank such a diffusion of true articles, blog to impart to us. Advanced post, maintain up with this great paintings. It's pleasant to know that this subject matter is being additionally covered in this web website so cheers for taking the time to talk about this! Thank you over and over! Super, an remarkable article that i absolutely loved. Furthermore kurt russell christmas coat, i can't assist considering why i did not peruse it earlier. I stay tuned and mindful of the following. 먹튀검증
ReplyDeletehigh-quality statistics! I lately got here for the duration of your blog and have been reading along. I notion i would leave my first commentary. I don’t recognize what to mention except that i have. I’m excited to discover this web page. I want to to thanks for ones time for th Outstanding blog. I took pleasure in scrutinizing your articles. That is extraordinarily a fantastic scrutinized for me. I have bookmarked it and i am suspecting scrutinizing new articles. Maintain doing high-quality! I experience extremely joyful to have visible your site web page and expect such a huge number of all of the more attractive situations perusing here. An awful lot liked all over again for each one of the points of interest. i need you to thank for your season of this brilliant read!!! I definately appreciate every and each piece of it and i have you bookmarked to take a look at new stuff of your blog an unquestionable requirement read blog! Sustain the great do the task, after i apprehend several threads within this net page similarly to i'm positive that a global-wide-internet blog web page is usually genuine useful possesses offered luggage connected with high-quality facts. I havent any word to welcome this post..... Really i'm stimulated from this publish.... The man or woman who make this submit it become an awesome human.. Thanks for imparted this . Tremendous weblog. I took delight in scrutinizing your articles. That is extraordinarily a terrific scrutinized for me. I have bookmarked it and i'm suspecting scrutinizing new articles. Maintain doing great! Right publish. Thank you for sharing with us. I just loved your manner of presentation. I loved studying this . Thank you for sharing and preserve writing. It is good to study blogs like this. I assume that is one of the most sizeable statistics for me. And i’m satisfied analyzing your article. However have to commentary on some popular matters, the internet web site style is best, the articles is simply high-quality : 먹튀폴리스
ReplyDeletefirst-rate day i'm so charmed i discovered your blog, i truly observed you unintentionally, at the same time as i was exploring on digg for something extraordinary, nevertheless i am right here now and can truely want to say an abundance of thanks for a noteworthy submit and an inner and out charming web page (i moreover love the topic/plan), i donít have the possibility to peruse the whole lot in the mean time yet i have bookmarked it and moreover introduced your rss channels, so whilst i've time i can have lower back to peruse drastically more, please preserve up the gorgeous work. Hello i recognize this is off theme yet i was contemplating whether or not you turned into aware of any devices i may want to add to my blog that obviously tweet my hottest twitter refreshes. I've been looking for a module like this for a protracted while and became trusting likely you will have some involvement in some thing like this. Kindly permit me recognise whether or not you run into something. I in reality recognize perusing your blog and that i expect this is an extremely good weblog. 먹튀검증
ReplyDeletewhat i do not comprehended could be very you're presently not virtually significantly greater all around preferred than you might be currently. You are extraordinarily sensible. You apprehend along these lines appreciably on the subject of this issue, created me as some distance because it subjects for me envision it from such limitless one-of-a-kind factors. Its like humans are not covered except if it's far one component to do with girl crazy! Your character stuffs brilliant. Constantly manage it up! You're very a whole lot appreciated than you may be at this moment. 먹튀검증
ReplyDeleteway cool! A few very admirable statements! I like you composing this evaluation and furthermore the remainder of the website is moreover usually incredible. Simply delighted in this article post. A lot thank you yet again. Certainly extraordinary. Extremely good! A good deal obliged to you! I all the time needed to compose on my web page something to that impact. Could i be capable of execute part of your submit to my website online? A debt of gratitude is in order for composing a decent article, i staggered onto your website and examine more than one articles. I love your approach of composing thanks on your weblog submit. Thanks again. Continue to compose. Im obliged for the item. Will peruse on generally i wear at study submit on sites, besides i want to mention that this assessment extremely pressured me to attempt to do it! Your composing style has been surprised me. Lots obliged, very first rate put up. 메이저사이트
ReplyDeleteYou have a good point here! I totally agree with what you have said !! Thanks for sharing your views ... hope more people will read this article . It is an excellent blog, I have ever seen. I found all the material on this blog utmost unique and well written. And, I have decided to visit it again and again. This is very interesting, You are a very skilled blogger. I've joined your rss feed and look forward to seeking more of your wonderful . Great post! Thanks for sharing. I like your content its unique and interesting, I have been always a fan of those who have this unique talent of writing unique content. Very informative post ! There is a lot of information here that can help any business get started with a successful social networking campaign . 토토사이트
ReplyDeleteHi, I do think this is an excellent web site. I stumbledupon it . I may return once again since i have book-marked it. Money and freedom is the best way to change, may you be rich and continue to guide others. Thank you for sharing superb informations. Your site is very cool. I’m impressed by the details that you’ve on this website. It reveals how nicely you perceive this subject. Bookmarked this web page, will come back for extra articles. You, my pal, ROCK! I found just the information I already searched all over the place and just couldn’t come across. What a great website. I do trust all of the ideas you’ve introduced for your post. They’re really convincing and will definitely work. Nonetheless, the posts are too quick for beginners. May you please extend them a little from next time? Thank you for the post. 토토사이트
ReplyDeleteexcellent publish. I analyze something completely new and tough on web sites i stumbleupon every day. It's going to usually be beneficial to study thru articles from different authors and use a little some thing from other internet web sites. This site was… how do you assert it? Relevant!! In the end i’ve found some thing that helped me. Appreciate it! After searching into many of the weblog posts to your website, i truly like your approach of running a blog. I stored it to my bookmark web page listing and might be checking back in the close to future. Please check out my web web page too and tell me your opinion. Having read this i concept it become extremely informative. I recognize you finding the time and effort to place this content collectively. 안전놀이터
ReplyDeletei used to be browsing net and thankfully got here across this website online and determined very thrilling stuff here. Its without a doubt amusing to examine. I loved lots. Thank you for sharing this top notch facts. It is clearly quality and meanful. It's genuinely cool weblog. Linking could be very beneficial issue. You've got sincerely helped lots of folks that visit weblog and provide them usefull facts . Very first-class article, i enjoyed studying your put up, very first-class share, i need to twit this to my fans. Thanks!. 먹튀검증
ReplyDeleteI curious more interest in some of them hope you will give more information on this topics in your next articles.
ReplyDeletedata science course in malaysia
Thank you for sharing wonderful content
ReplyDeletedata science courses aurangabad
This post is very simple to read and appreciate without leaving any details out. Great work!
ReplyDeletedata science training
I wish more writers of this sort of substance would take the time you did to explore and compose so well. I am exceptionally awed with your vision and knowledge.
ReplyDeletedata scientist training in hyderabad
With enough washes and sustained use, Old Style Aloe Toxin Rid Shampoo may help you pass a hair drug test by cleansing your scalp and hair of any traces of narcotics such as cannabis. It is simple to wash your hair with this drug test shampoo; just follow the same steps as you would with any other shampoo. You’ll have to repeat the process several times to get it right, and you'll have to be meticulous. The clarifying shampoo is designed to penetrate the cortex's hard portion through your hair cuticles to cleanse your hair scalp. The rest will be taken care of by the shampoo, which will remove the metabolites from the body. It works to clear away any toxin build-up and wash off all weed metabolites from the scalp's roots and hair strands
ReplyDeleteNice post to kearn.
ReplyDeleteData science course in pune
Thank you for your excellent informаtion. Τhey’re so beneficial.
ReplyDelete온라인경마
경마사이트
It’s truly a nice and helpful piece of information. I’m happy that you simply shared this helpful information with us. 카지노
ReplyDeleteOh my goodness! Impressive article dude! Thank you, However I am
ReplyDeletegoing through issues with your RSS. I don’t understand why I can’t subscribe to it.
Is there anybody getting similar RSS issues?
Anyone that knows the solution can you kindly respond?
Thanks!!
청마담
magosucowep
Thank you, the article was very helpful. I am now much more aware of students needs related to writing. Will use these strategies in my lessons from now on.
ReplyDeleteBest Refrigerator Repair Service in Hyderabad
I absolutely agree with the above. In addition, I would encourage using a service like Yorkie puppies for sale, sphynx cats for sale
ReplyDeleteReally wonderful blog completely enjoyed reading and learning to gain the vast knowledge. Eventually, this blog helps in developing certain skills which in turn helpful in implementing those skills. Thanking the blogger for delivering such a beautiful content and keep posting the contents in upcoming days.
ReplyDeletehref="https://www.serviceonstreet.com/washing-machine-repair-service-hyderabad/">Best Washing Machine Repair Service in Hyderabad
Extraordinary composition! You have energy for enlightening composition. Your substance has intrigued me beyond anything describable. I have a great deal of adoration for your composition. Much obliged to you for all your important contribution on this theme…
ReplyDeleteMachine Learning Training in Hyderabad
ReplyDeleteExcellent content ,Thanks for sharing this .,
Online teaching tools
Virtual classroom setup
Skills for online teachers
Nice blog, informative content. I really enjoyed while reading this blog. I book marked your site for further reads. Keep sharing more.
ReplyDeleteData Science Course in Hyderabad
Nice information, informative and knowledgeable content. Keep sharing more blogs with us.
ReplyDeleteData Science Course in Hyderabad
ReplyDeleteDachshunds are bred and shown in two sizes: Standard and Miniature. https://www.cutespupsforsale.com/ Standard Dachshunds of all varieties (Smooth, Wirehair, and Longhair) usually weigh between 16 and 32 pounds. Miniature Dachshunds of all varieties weigh 11 pounds and under at teacup poodle for sale maturity. Dachshunds that weigh between 11 and 16 pounds are called Tweenies. Some people who breed exceptionally small Dachshunds advertise them as Toy Dachshunds, but this is purely a poodles for sale marketing term, not a recognized designation. He's bred for perseverance, which is another way of saying that he can be stubborn. Dachshunds have a reputation for being dachshund puppies sale entertaining and fearless, but what they want most is to cuddle with their people. Longhairs are calm and quiet, and Smooths have dachshund for sale a personality that lies somewhere in between. Some Mini Dachshunds can be nervous or shy, but this isn't correct for the breed. Avoid puppies that show these characteristics.Like every dog, Dachshunds need early socialization-exposure to many different people, dachshund puppies for sale near me sights, sounds, and experiences-when they're young. Socialization helps ensure that your Dachshund puppy grows up to be a well-rounded dog. .
Hi, of course this piece of writing is actually fastidious and I have learned lot
ReplyDeleteof things from it concerning blogging. thanks.
ragdoll kitten near me
What’s Going down i’m new to this, I stumbled upon this I have found It positively useful and it has aided me out loads.
I hope to give a contribution & help different users like its aided me.
Good job.
goldendoodle for sale
Ahaa, its nice dialogue about this piece of writing at this place at this webpage,
I have read all that, so at this time me also commenting here.
teacup havanese puppies for sale
I take pleasure in, result in I discovered exactly what I used to be taking a look
for. You’ve ended my 4 day lengthy hunt! God Bless you man. Have a nice
day. Bye
pomeranian teacup for sale
Waytowebs is One of Hyderabad's largest and best-known graphic design company, Our top graphic designers are working hard to create your brand's inspired and productive ..
DeleteGraphic design company in Hyderabad
Graphic designing agency in Hyderabad
Best graphic designing agency in Hyderabad
Best graphic designing company in Hyderabad
https://www.waytowebs.com/graphic-designers.html
+91 99519 91336
info@waytowebs.com
design@waytowebs.com
Plot No.656, Opp: VPC Residency, 1st Floor, Madhapur, Hyderabad, Telangana 500081.
I love what you guys are usually up too. This sort of clever work and coverage! Keep up the excellent works guys I’ve you guys to my own blogroll.
ReplyDeleteragdoll kittens for sale near me
I have read your excellent post. This is a great job. I have enjoyed reading your post first time. I want to say thanks for this post. Thank you. 메이저토토
ReplyDeletesearch about the topic and 토토사이트 found most people will believe your blog amazing post, Really looking forward to read more
ReplyDeleteI read this post completely 토토사이트검증 about the comparison of hottest and previous technologies, it’s remarkable article.
ReplyDeleteI have bookmarked your site since this site contains significant data in it. You rock for keeping incredible stuff. I am a lot of appreciative of this site.
ReplyDelete
ReplyDeleteI love your blog.. very nice colors & theme. Did you design this website yourself or did you hire someone to do it for you? Plz reply as I’m looking to construct my own blog and would like to find out where u got this from. thanks a lot|data science course in jodhpur
360DigiTMG, the top-rated organisation among the most prestigious industries around the world, is an educational destination for those looking to pursue their dreams around the globe. The company is changing careers of many people through constant improvement, 360DigiTMG provides an outstanding learning experience and distinguishes itself from the pack. 360DigiTMG is a prominent global presence by offering world-class training. Its main office is in India and subsidiaries across Malaysia, USA, East Asia, Australia, Uk, Netherlands, and the Middle East.
ReplyDeleteHi Thanks for Sharing this Valuable Information with us: this is very useful for me. Keep it Up.
ReplyDeletedata scientist course in aurangabad
I feel very grateful that I read this. It is very helpful and very informative and I learned a lot from it.
ReplyDeletecyber security course
This is a really very nice post you shared, i like the post, thanks for sharing..
ReplyDeletecyber security course
Wonderful detail. I also do some of it a lot, but not all the time. The rest creates excellent sense.
ReplyDeleteTractor Rear Tyre
I frankly admire your effort in managing this issue
ReplyDeletetractor tyre price
Great and edifying. Well explained with a useful example
ReplyDelete4x4 tractor price
ReplyDeleteVery informative Blog! There is so much information here that can help thank you for sharing.
Thanks for posting this fabulous post.
ReplyDeleteUsually I never comment on blogs but your article is so convincing that I never stop myself to say something about it. You’re doing a great job Man,Keep it up. Meanwhile visit our website for amity solved synopsis
Thanks for posting this fabulous post.
ReplyDeleteUsually I never comment on blogs but your article is so convincing that I never stop myself to say something about it. You’re doing a great job Man,Keep it up. Meanwhile visit our website for nmims assignment solution
I’m really happy to say it was an interesting post to read. I learned new information from your article on imt cdl project synopsis
ReplyDeleteyou are doing a great job
Thanks a lot for giving us such a helpful information. You can also visit our website for amity online assignments
ReplyDeleteThanks for posting this fabulous post.
ReplyDeleteUsually I never comment on blogs but your article is so convincing that I never stop myself to say something about it. You’re doing a great job Man,Keep it up. Meanwhile visit our website for amity assignment solutions
I’m really happy to say it was an interesting post to read. I learned new information from your article on project report for bcom students
ReplyDelete, you are doing a great job
I feel very grateful that I read this.
ReplyDeleteAt Ashish Life Science Pvt Limited (ALS) poultry drugs distributors in ethiopia, we believe in creating values in the human-animal ecosystem. Our range of cutting-edge Veterinary products, World-class manufacturing infrastructure and relationship driven approach are the testimony to this belief. Built on this belief, we have grown manyfold since the beginning as a Veterinary pharmaceutical manufacturing company in the year 2002.
Poultry drugs distributors in Ethiopia
Nice article, really informative
ReplyDeleteBuy Baby cradle
I’m really happy to say it was an interesting post to read. I learned new information from your article on nmims solved assignment 2022
ReplyDelete, you are doing a great job
Usually I never comment on blogs but your article is so convincing that I never stop myself to say something about it. You’re doing a great job Man,Keep it up. Meanwhile visit our website for imt cdl project synopsis
ReplyDeleteyurtdışı kargo
ReplyDeletenft nasıl alınır
en son çıkan perde modelleri
lisans satın al
uc satın al
en son çıkan perde modelleri
minecraft premium
özel ambulans
Thanks for sharing such a great blog. Very helpful and interesting. fence-companies-miami
ReplyDeleteThanks for sharing such a great post. Looking for more. Sump pump kansas city
ReplyDeleteI like you blog ...its very nice
ReplyDeletemaking a journal entry in QuickBooks Online
I read your blog its nice, I get many useful information which i need so keep writing blog for your future and spread the awareness about yours service
ReplyDeleteprocess of exporting the data file from QuickBooks online to desktop
You have nice blog i impress QuickBooks company file data damage error.
ReplyDeleteMachine learning that deals with algorithms and data to advance the machine by using the past
ReplyDeletedata to formulate a possible and advanced outcome of a possible future, months in advance.
artificial intelligence classes in pune
Really impressed! Information shared was very helpful Your website is very valuable. Thanks for sharing.
ReplyDeleteFood Processing Consultants
It's just awesome. I will share this with my friends too.
ReplyDeleteIf you searching for authentic trending news articles
Just click on:
pakistan it companies
advertising agencies
company for digital marketing
Joker88 menyediakan Slot gacor joker88 untuk memudahkan anda menadpatkan keuntungan dalam jumlah besar. Dengan Modal Termurah Slot Joker88 bisa menjadi pilihan yang tepat https://www.slotgacorjoker88.top/
ReplyDeleteदेखने के लिए इस वेबसाइट पर जाएं नागिन 6 उच्च गुणवत्ता में सभी एपिसोड वीडियो।
ReplyDeleteThank You for share your stuff, keep posting
ReplyDeletemobile app development company in Hyderabad
ERP software company in Hyderabad
The chip in a Mastercard is a microchip, or little PC, that makes a charge card exchange safer. These chips, likewise called EMV chips, create a one-of-a-kind code each time you "plunge" your card into an installment terminal or tap to pay western union money transfer. https://cashoutcarders.com/
ReplyDeletehttps://ufavvip789.vip/
ReplyDeletehttps://betworld789.net/
https://fluck2222.wixsite.com/chudjennew02
vvip789(7)
I am building standalone s meter using atmega168 chip and flashing with ns.hex has anyone had success using nano clones to build this for ubitxv6 boards?
ReplyDeleteLoved this blog. I will wait for the next blog from your side. We are also one of the best ios app development companyCompany.
ReplyDeleteThis Blog is very useful and informative.
ReplyDeleteData Science Certification Course
Wow, this article is fastidious.Great post i must say and thanks for the information. Digital Marketing
DeleteYour entire blog is great. You did a really nice job. I appreciate you providing the information; it was very helpful. I'm hoping to see several more entries from you.
ReplyDeleteInteresting blog, I must say. erp customization
we face any issue regarding its servicing or any technical problem, we try to solve it as soon as possible and that too from well trained professionals. Dell Laptop Service Center will help you come out and give you benefits of high quality service. Their expert technicians ensure that you get all your laptops issues resolved timely and in accost effective manner.
ReplyDeleteDell Laptop Service Center in Noida
Dell Laptop Service Center in Noida Sector-18
Dell Laptop Service Center in Noida Sector-62
Dell Laptop Service Center in Noida Sector-15,16
Dell Laptop Service Center in Noida Sector-50,51,52
Wow, this article is fastidious.Great post i must say and thanks for the information. Digital Marketing
ReplyDeleteNICE
ReplyDeleteChotu Chai the best place for sitting in our cafe where you can enjoy yourself with your family and friends and can make some unforgettable memories with them.Chotu Chai serivces inspire of mothers love to service delicous food items and super chai. We are provide chai, milk, lassi, mocktails, milkshakes, sandwich, french fries and etc.We also try to make our customers happy by serving tastes that rejuvenate the mood.
Best tea Franchise in Hyderabad
Chai Franchise Hyderabad
Chotu Chai
Chotu Chai Mr Tea Building K N R Grand Hastinapuram Hyderabad 500070 Telangana
info@chotuchai.com
+91 95050 97474
https://chotuchai.cafe/
nice blog
ReplyDeleteChotu Chai the best place for sitting in our cafe where you can enjoy yourself with your family and friends and can make some unforgettable memories with them.We are provide chai,masala chai, milk, lassi, mocktails, milkshakes, sandwich, french fries and etc.We also try to make our customers happy by serving tastes that rejuvenate the mood.
Tea franchise in Hyderabad
Best tea Franchise in Hyderabad
Chai Franchise Hyderabad
Chotu Chai
Chotu Chai Mr Tea Building K N R Grand Hastinapuram Hyderabad 500070 Telangana
info@chotuchai.com
+91 95050 97474
https://chotuchai.cafe/
I appreciate how well-researched this post is. It's evident that you put a lot of effort into gathering information and presenting it concisely and informally. Local Roofing Companies
ReplyDeletehttp://www.hamskey.com/2019/02/faa-450-antenna-analyzer-eu1ky.html?sc=1694066972401#c2333383223414193756
ReplyDeletehttps://www.sfdcstuff.com/2022/10/lightning-tree-grid-account-hierarchy.html#comment-form
http://www.wallstreetrant.com/2020/07/continued-bs-from-bureau-of-labor.html?sc=1694067033885#c943923724406627518
http://eparachute.com/blog/Coaches_Here_are_4_Transferable_Skills_for_Your_Clients_Success#discussion
https://www.ryanic.com/2018/04/resolving-rest-over-http-man-in-middle.html#comment-form
Thank you for your advice!
ReplyDeleteChotu Chai is a popular Chai franchise in Hyderabad . We now serve the best quality tea at our outlet, and the customer response was fantastic .Each tea in our selection is created with great effort in one of our tea …
Chai Franchise
+91 95050 97474
Info@Chotuchai.Com
https://chotuchai.cafe/
K N R Grand Hastinapuram
Hyderabad 500070 Telangana.
Android single app mode easily with CubiLock and prevent users from accessing other apps.
ReplyDeleteWow, this article provided me with valuable insights. I'll definitely implement these tips in my daily routine. www.windowcleanerscoquitlam.com
ReplyDeleteHi Ian, I got a ver6 from a friend with a Nextion screen but am unable to load your software onto the screen. I get an error message " File version to low ". After doing some homework I figured out that the screen I have is newer than the compiler you used to make " ubitx_28_e.tft with. I downloaded the Nextion compiler software but am getting this error " Error:Page:pqrcode the remaining memory is not enough to run the temporary use of QR code (-261). Please decrease the value of txt_maxI to reduce the consumption of the memory " is there any chance you could publish an updated file set for nextion
ReplyDeleteThis tutorial is helpful for anyone looking to understand these components and their functionality. If you are searching for assignment writing services in Pakistan, make sure to check out reputable providers who can assist you in completing your academic tasks with professionalism and quality.
ReplyDeleteI love it. It's good to know that it has been released. driveway sealing indianapolis
ReplyDeleteThe Low cost chai franchise in Hyderabad with Chotu Chai gives heartmelting vibes and the delicious snack items makes mouthwatering. Our Treatful service is waiting to fill ur heart with love and effection at chotu chai. Tea franchise in Hyderabad
ReplyDeleteBest tea Franchise in Hyderabad
Chai Franchise Hyderabad
Best chai Franchise in Hyderabad
top chai Franchise in Hyderabad
chai Stall Franchise in Hyderabad
chai franchise under 1 lakh in hyderabad
tea shop franchise in hyderabad
Low cost chai franchise Hyderabad
Low cost chai franchise in India
Tea franchises in India
+91 95050 97474
Info@Chotuchai.Com
https://chotuchai.cafe/
K N R Grand Hastinapuram Hyderabad 500070 Telangana.
Chotu Chai Cafe is one of the most iconic and unique tea shop franchise in hyderabad. It’s a place where you can have the best chai tea in town, enjoy a cup of tasty coffee, or even make new friends.
ReplyDelete+91 95050 97474
https://chotuchai.cafe/
chotuchaiindia@gmail.com
Chotu Chai, Third floor, Pillar No:87, Opposite to Domino's, Boduppal, Hyderabad- 500092.
Thanks for this blog you give nice information
ReplyDeleteChotu Chai Cafe is one of the most unique Tea shop Franchise in Hyderabad. It’s a place where you can have the Chai Franchise with the coolest budget and premier quality. Enjoy a cup of tasty tea ,or even make new friends.
+91 95050 97474
https://chotuchai.cafe/
chotuchaiindia@gmail.com
Chotu Chai, Third floor, Pillar No:87, Opposite to Domino's, Boduppal, Hyderabad- 500092.
www.medium.com
ReplyDeletetengo una pantalla nx4832f035_011 no puedo cargar el archivo ayuda por favor
ReplyDeleteThis comment has been removed by the author.
Deleteya solucione encontre sofware y modifique para mi pantalla gracias y exelente trabajo
ReplyDeleteHi, I have the " file version too low" error message on my new Nextion 2.8" display. I can upload other .tft files without problems, so my SD card seems OK. Can you give us an updated version of files.tft ( with last Nextion editor), to solve the problem?
DeleteWhen I try your HMI with editor, it gives me : Error:Page:pqrcode The remaining memory is not enough to run .....It seems a problem experienced by other people .I need help.Thank you
Paul
Fantastic guide! The step-by-step instructions for integrating the Nextion LCD with uBITX using the CEC firmware are incredibly helpful. The detailed explanations and clear visuals make the process straightforward, even for those new to hardware modifications. This resource is invaluable for enhancing the uBITX experience. Thank you for sharing such a comprehensive and well-structured tutorial! Luiz Gustavo Mori
ReplyDeleteAbsolutely fantastic walkthrough of installing the uBITX with Nextion LCD using CEC firmware! 👏 Your step-by-step guide made firmware uploads crystal clear, and the compatibility notes for various LCD types are incredibly helpful. Thanks for making this complex process so approachable! Daniel Dantas
ReplyDeleteReally impressed by your detailed walkthrough on the µBITx & Nextion LCD CEC firmware! Your explanations make complex setup steps clear and easy to follow—especially the wiring guide and example screenshots. Thanks for sharing this valuable resource; it's a huge help for hobbyists like me! Luiz Antonio Duarte Ferreira
ReplyDeleteAmazing work on uBITx + Nextion LCD CEC firmware! The detailed walkthrough, photos, and thoughtful explanations make it so much easier to follow. Truly impressive effort—thanks for sharing your expertise and making what seemed complex both clear and exciting! Beatriz Barata
ReplyDeleteIntegrating the Nextion LCD with µBITx using CEC firmware brings enhanced usability and better display control. This guide covers installation, settings, and configuration steps. Perfect for HAM radio enthusiasts wanting a polished, responsive graphical interface upgrade. Veronica Dantas
ReplyDeleteWhat an excellent post! The walkthrough on integrating uBITX with Nextion LCD and the CEC firmware is clear, detailed, and very informative. The diagrams and step‐by‐step coding explanations really help. Thanks for sharing this—it’s a great resource for builders and makers! Sidney De Queiroz Pedrosa
ReplyDeleteManchester City berhasil meraih kemenangan dramatis pekan ini, memberikan tekanan besar bagi Arsenal dan Chelsea di papan atas klasemen. https://paranormalresearchonline.com/u-18-manchester-united-bantai-u-18-liverpool
ReplyDelete