Nowadays, digital communication is popular in amateur radio. JT65 and FT8 are capable of DX communication with weak signals.
In the era of urbanization, the space for installing antennas is gradually diminishing. So we seem to prefer communications that can be transmitted away with weak signals.
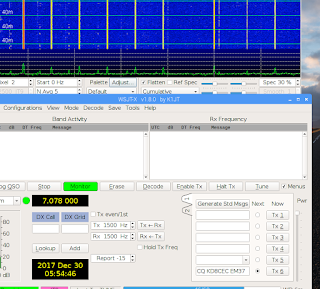
Install wsjtx, the most representative software for weak signal digital communication, in Raspberry Pi.
The basic setting for Raspberry Pie is 'Raspberry pi 3 Setup (basic)' on this blog.
http://www.hamskey.com/2017/12/raspberry-pi-3-setup-basic.html
If the installation order changes, it may not work normally or you see the many erros because wsjtx uses other libraries.
0.Turn on Raspberry PI

1.apt-get update
Click Terminal Icon on taskbar
type 'sudo apt-get update' [enter]

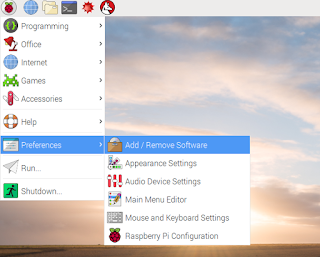
2.Click Raspberry pi Icon on taskbar -> Preferences -> Click Add/Remove Software
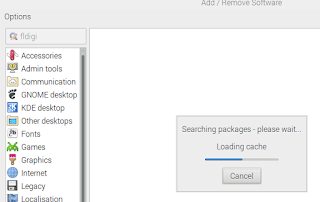
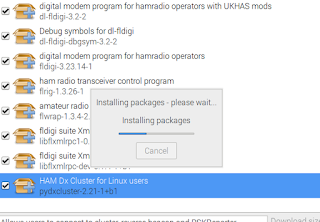
3.type 'fldigi' enter on left top edit box
4. Check all items
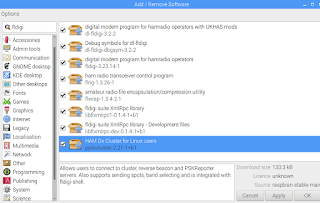
5.Press [OK] Button

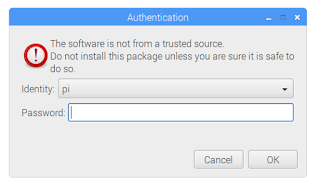
6.wait moment, then type password for user pi
default password of pi is 'raspberry'

7.wait for install complete (2~5 minute)
8.When all the installation is finished, the Add/Remove Software window is closed.
You can see the installed amateur radio related software like blow image
click Raspberry pi icon on taskbar -> Hamradio

9.apt-key update
type 'sudo apt-key adv –keyserver keyserver.ubuntu.com –recv-keys 862549F9' inter terminal
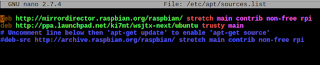
type 'sudo nano /etc/apt/sources.list'
add 1 line
deb http://ppa.launchpad.net/ki7mt/wsjtx-next/ubuntu trusty main
9.1 apt-get update
Click Terminal Icon on taskbar
type 'sudo apt-get update' [enter]
10.Install wsjtx
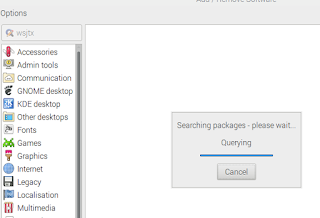
Click Raspberry pi icon on taskbar -> Preferences -> click Add/Remove Software
type 'wsjtx' [Enter]
11.Check item (Version check -> 1.8.0)
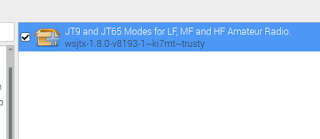
12.Click OK Button, and type password for pi -> click ok button
pi ha default password as 'raspberry'
13.complete install wsjtx, you can see the wsjtx icon

14.Run wsjtx
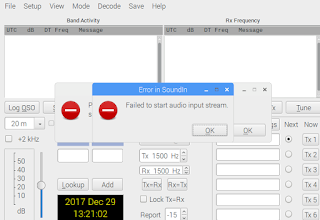
perhap you will see Error dialog boxs. - no problem
Click to OK Buttons
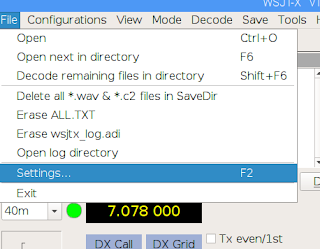
15.Clieck Settings menu (File -> Settings)

(qrz.com)

In my case, I used an external USB ($1 in aliexpress) card and it worked when I set it like above.
18.All installations are complete.
WSJT-X restart and enoy
In the era of urbanization, the space for installing antennas is gradually diminishing. So we seem to prefer communications that can be transmitted away with weak signals.

Install wsjtx, the most representative software for weak signal digital communication, in Raspberry Pi.
The basic setting for Raspberry Pie is 'Raspberry pi 3 Setup (basic)' on this blog.
http://www.hamskey.com/2017/12/raspberry-pi-3-setup-basic.html
0.Turn on Raspberry PI

1.apt-get update
Click Terminal Icon on taskbar
type 'sudo apt-get update' [enter]

2.Click Raspberry pi Icon on taskbar -> Preferences -> Click Add/Remove Software

3.type 'fldigi' enter on left top edit box

4. Check all items

5.Press [OK] Button

6.wait moment, then type password for user pi
default password of pi is 'raspberry'

7.wait for install complete (2~5 minute)

8.When all the installation is finished, the Add/Remove Software window is closed.
You can see the installed amateur radio related software like blow image
click Raspberry pi icon on taskbar -> Hamradio

9.apt-key update
type 'sudo apt-key adv –keyserver keyserver.ubuntu.com –recv-keys 862549F9' inter terminal
type 'sudo nano /etc/apt/sources.list'
add 1 line
deb http://ppa.launchpad.net/ki7mt/wsjtx-next/ubuntu trusty main

9.1 apt-get update
Click Terminal Icon on taskbar
type 'sudo apt-get update' [enter]
10.Install wsjtx
Click Raspberry pi icon on taskbar -> Preferences -> click Add/Remove Software
type 'wsjtx' [Enter]

11.Check item (Version check -> 1.8.0)

12.Click OK Button, and type password for pi -> click ok button
pi ha default password as 'raspberry'

13.complete install wsjtx, you can see the wsjtx icon

14.Run wsjtx
perhap you will see Error dialog boxs. - no problem
Click to OK Buttons

15.Clieck Settings menu (File -> Settings)

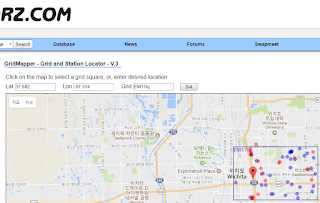
16.input your Callsign and Grid

If you do not know your grid, see below link.
https://www.qrz.com/gridmapper
(qrz.com)
17.Set Audio
Depending on your audio settings, it may look different from the screen below.

In my case, I used an external USB ($1 in aliexpress) card and it worked when I set it like above.
18.All installations are complete.
WSJT-X restart and enoy
root@FriendlyELEC:~# apt-key adv -keyserver keyserver.ubuntu.com recv-keys 862549F9
ReplyDeleteExecuting: /tmp/tmp.vkYCdEMhRB/gpg.1.sh -keyserver
keyserver.ubuntu.com
recv-keys
862549F9
gpg: conflicting commands
DeleteErr:1 http://ppa.launchpad.net/ki7mt/wsjtx-next/ubuntu trusty InRelease
ReplyDeleteThe following signatures couldn't be verified because the public key is not available: NO_PUBKEY 5794D54C862549F9
Reading package lists... Done
W: GPG error: http://ppa.launchpad.net/ki7mt/wsjtx-next/ubuntu trusty InRelease: The following signatures couldn't be verified because the public key is not available: NO_PUBKEY 5794D54C862549F9
E: The repository 'http://ppa.launchpad.net/ki7mt/wsjtx-next/ubuntu trusty InRelease' is not signed.
N: Updating from such a repository can't be done securely, and is therefore disabled by default.
N: See apt-secure(8) manpage for repository creation and user configuration details.
Fix for the error above.
Deletesudo apt-get install wsjtx
E: dpkg was interrupted, you must manually run 'sudo dpkg --configure -a' to correct the problem.
s
udo dpkg --configure -a
sudo apt-get install wsjtx
These instructions are no longer functioning.
ReplyDeleteTry it : apt-key adv --keyserver hkp://keyserver.ubuntu.com:80 --recv-keys 862549F9
ReplyDeleteHello
ReplyDeleteI'm doing a new install of WSJT and am having problems with step 9 above.
sudo apt-key adv –keyserver keyserver.ubuntu.com –recv-keys 862549F9
Executing: /tmp/apt-key-gpghome.HVQiLV2SQn/gpg.1.sh –keyserver keyserver.ubuntu.com –recv-keys 862549F9
gpg: WARNING: no command supplied. Trying to guess what you mean ...
usage: gpg [options] [filename]
This is copied from your blog and pasted into the terminal.
apt-key adv --keyserver hkp://keyserver.ubuntu.com:80 --recv-keys 862549F9
ReplyDeleteExecuting: /tmp/apt-key-gpghome.SJkXrkWYqi/gpg.1.sh --keyserver hkp://keyserver.ubuntu.com:80 --recv-keys 862549F9
gpg: key FD9A443C862549F9: public key "Totally Legit Signing Key " imported
gpg: Total number processed: 1
gpg: imported: 1
gpg: no writable keyring found: Not found
gpg: error reading '[stdin]': General error
gpg: import from '[stdin]' failed: General error
gpg: Total number processed: 0
I believe both of the URLs in section 9 (above) are now broken. As noted in the previous post, the key server does something but it may not be working completely.
ReplyDeleteThe URL at ki7mt is "not found"
bummer
check it before buying Raspberry Pi
ReplyDeleteLaptop SSD Upgrade in Mumbai | Laptop RAM Upgrade in Mumbai | Hp Laptop Charger Replacement in Mumbai | Dell Laptop Battery Replacement in Mumbai | Laptop Screen Replacement in Mumbai | Hp Laptop Screen Replacement Malad | Acer Laptop Screen Replacement Goregaon | Lenovo Laptop Screen Repair Mumbai
ReplyDelete